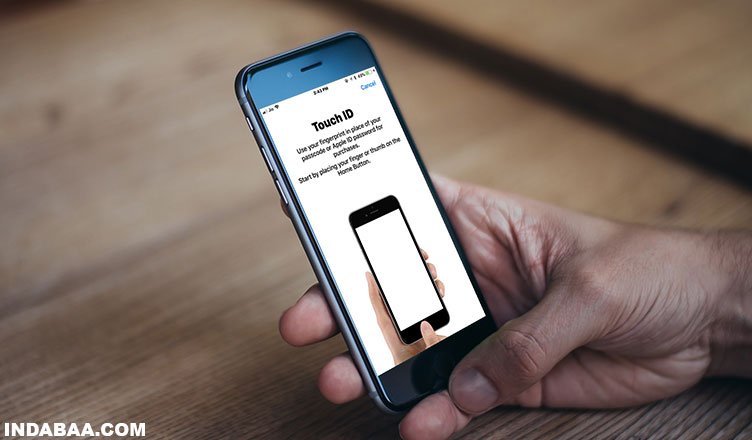
Touch ID was first introduced by Apple in its iPhone 5s and then all its iPhones, excluding iPhone X, which is equipped with Face ID. The feature is still installed in Apple’s flagship iPhone 8 and 8 Plus smart phones. Unlike Face ID, which recognizes users’ face, Touch ID feature scans fingerprints of the phone owners. Once, users setup Touch ID on their iPhone and iPad, they can use this feature to unlock their iOS device, use Apple Pay, and make purchases on iTunes and App Store. You can also use Touch ID on iPad (5th generation), iPad Pro, iPad Air 2, or iPad mini 3 or later. Now read this complete guide on how to setup Touch ID on iPhone and iPad.
The process to setup and use Touch ID on iPhone and iPad is similar. Before you set up Touch ID, you need to setup a passcode on your iPhone or iPad, and then follow the method given below.
How to Setup and Use Touch ID on iPhone 8, 8 Plus, 7, 7 Plus, 6(s), 6(s) Plus, 5s and iPad
Preparations…
- Keep your iPhone or iPad home button and your fingers clean and dry.
- Select the finger which is not cut, burnt, or damaged otherwise.
- Make sure your finger nails are clipped properly as your nails can prevent you from registering your finger properly.
- Wipe out oil residue or water from your fingers; also use a microfiber cloth to clean home button of your iPhone and iPad.
Quick Links
- How to Setup Touch ID
- How to Unlock iPhone and iPad Using Touch ID
- How to Make Purchases with Touch ID
- How to Use Touch ID for Apple Pay
- How to Identify a Touch ID Fingerprint
- How to Label a Touch ID Fingerprint
- How to Disable Touch ID for Lock Screen, Apple Pay, and iTunes & App Store
- How to Delete Touch ID Fingerprints
How to Setup Touch ID on iPhone and iPad
Step #1: On your iPhone/iPad, open Settings → Touch ID & Passcode, and then enter your passcode.
Step #2: Now tap on Add a Fingerprint option.
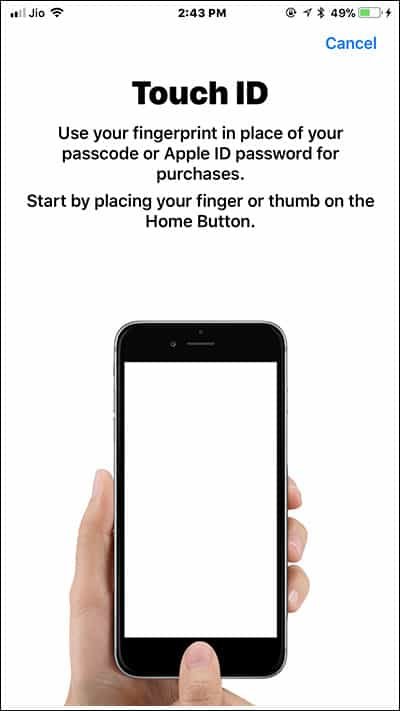
Step #3: Now you are on ‘Place Your Finger’ screen. You are instructed to lift and rest your finger on the Home button repeatedly.
Remember, you are not supposed to press your phone’s home button; gently place your finger and then lift and rest. Put your finger on Home button in different positions/angles; your phone will scan your finger.
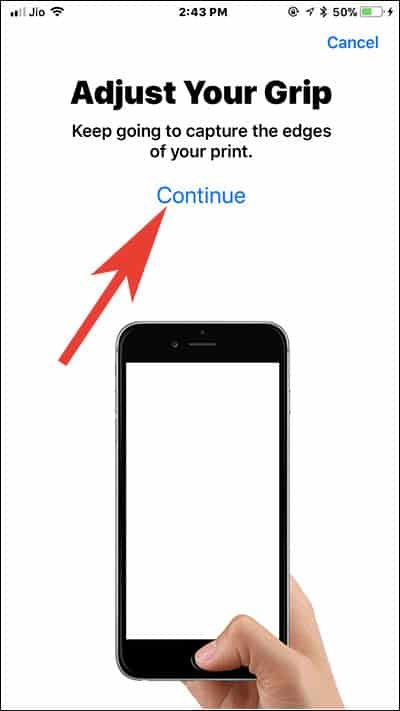
Step #4: Once your finger is scanned, you are now on ‘Adjust Your Grip’ screen. Here, you are instructed to keep going to capture the edges of your print. You need to tap on Continue button.
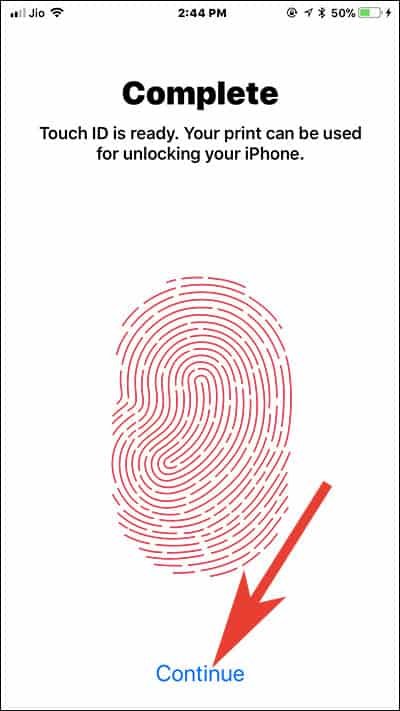
Step #5: Again, you will be asked to Place Your Finger. Do as instructed; after some time, your Touch ID is ready. Tap on Continue.
That’s it! Your fingerprint is completed and you can use your print to unlock your iPhone or iPad. You can add more than one finger on your iPhone by following above method.
Now you are ready to use your Touch ID to unlock your iOS device and make purchases.
How to Unlock iPhone and iPad Using Touch ID
Make sure that you have enabled iPhone unlock option under USE TOUCH ID FOR section.
Step #1: Hold your device in your hands and press either home button or sleep/wake button to wake up the lock screen.
Step #2: Next, simply keep your finger you registered with Touch ID on the Home button, and your phone will be unlocked.
How to Make iTunes and App Store Purchases with Touch ID
Touch ID is a more comfortable and quicker option than Apple ID password to make purchases in the iTunes Store, App Store, and iBooks Store.
Before you use your Touch ID to make purchases, you need to enable iTunes & App store option under USE TOUCH ID FOR in Touch ID & Passcode. Simply open Settings → Touch ID & Passcode → Enter Passcode and then turn on iTunes & App Store option. Note that you may be prompted to enter your Apple ID password here. (Follow this guide if you have Forgotten Apple ID Password)
Step #1: First, launch iTunes Store, App Store, or iBooks Store on your iPhone or iPad.
Step #2: Tap on any item, book, movie, song, or app to buy or download.
Step #3: This will bring up Touch ID prompt from the bottom of your phone screen.
Step #4: If you want to buy or download the item, simply touch the Home button, or you can cancel this prompt by tapping on Cancel button from top right corner of the prompt.
How to Use Touch ID for Apple Pay
First of all, you need to enable Apple Pay option under USE Touch ID FOR.
If you have setup Apple Pay on your iPhone, you can use your Touch ID to make purchases with Apple Pay. You can use your Touch ID on iPhone 6 or iPhone 6 Plus or later versions. With your Touch ID, you can make Apple Pay purchases in stores, within apps, and on websites in Safari browser. Moreover, Touch ID on iPhone will also help you complete website purchases from Mac. If you own iPad Pro, iPad Air 2 or iPad Mini 3 or later, you can make Apple Pay purchases within apps and on websites in Safari with Touch ID.
How to Identify a Touch ID Fingerprint
When you register more than one finger with Touch ID, all your registered fingers will be listed as Finger 1, Finger 2, Finger 3 and so on under the section FINGERPRINTS. While everything goes smooth, you need to identify your Touch ID fingerprint when you want to delete one of your fingerprints on your device. You don’t know which finger is registered as Finger 1; in this situation, you need to identify a Touch ID fingerprint.
Step #1: Open Settings → Touch ID & Passcode → Enter Passcode.
Step #2: Now put your registered finger on the Home button.
Step #3: Next, quickly see the list of fingers registered under FINGERPRINTS. The corresponding finger label will turn from white to gray.
Thus, you get to know which of your fingers is registered as Finger 1, 2, 3, and so on.
How to Label a Touch ID Fingerprint
A better way to remember which finger is registered under which finger number, you can label your Touch ID fingerprint.
Step #1: Open Settings app on your device.
Step #2: Tap on Touch ID & Passcode.
Step #3: Enter your passcode when prompted.
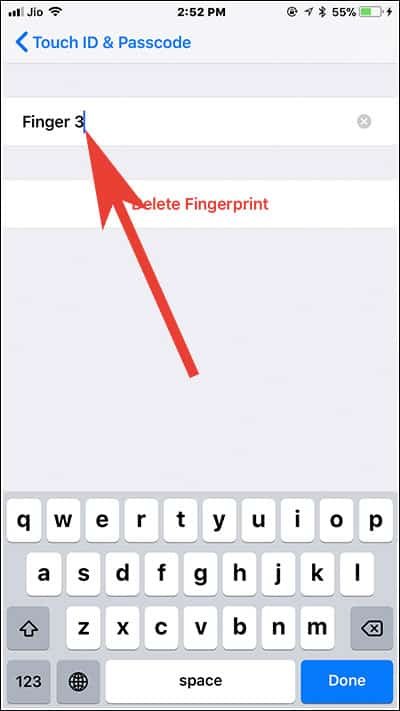
Step #4: Since you know which finger is which, simply tap on Finger number you want to label or rename.
Step #5: Next, type a name that you can identify; for example, I have entered Right Middle for the middle finger of my right hand.
Step #6: Finally, tap on Done button from the bottom right corner.
You can give label to each fingerprint you have registered with Touch ID by following above mentioned steps.
How to Disable Touch ID for Lock Screen, Apple Pay, and iTunes & App Store
Touch ID is a comfortable way you can make purchases on Apple Pay and iTunes & Apple Store. If you are looking for more secure numeric password, you can turn off Touch ID.
Step #1: Open Settings on your device.
Step #2: Tap on Touch ID & Passcode.
Step #3: Type in your passcode.
Step #4: Here, you can toggle iPhone Unlock, Apple Pay, and iTunes & App Store OFF.
How to Delete Touch ID Fingerprints
If you have registered finger of your family members with Touch ID, you can delete his/her Touch ID fingerprints. It is common to give your phone access to somebody else for time being; after that stipulated time, you should remove that fingerprint from your phone.
Step #1: Open Settings app on your iPhone or iPad.
Step #2: Now tap on Touch ID & Passcode option.
Step #3: Enter the passcode.
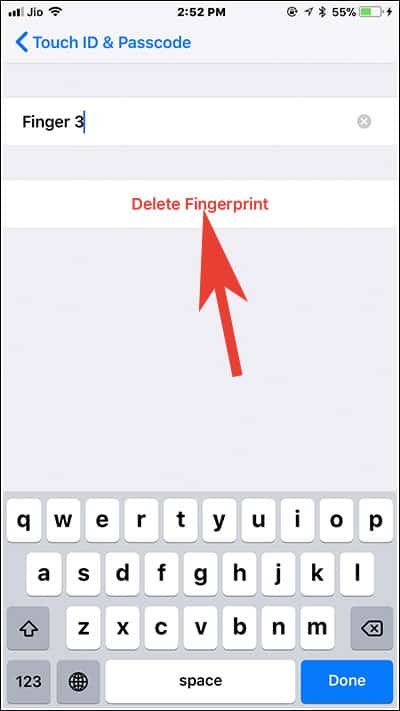
Step #4: Select the fingerprint you want to delete; your selection is made easy as you have labelled each fingerprint.
Step #5: Next, you need to tap on Delete Fingerprint button.
Your fingerprint will be deleted quickly and you will be landed back on Touch ID & Passcode screen on your device.
That’s it guys! Enjoy this feature on your Touch ID compatible devices. Note that Apple may remove this feature completely in future as it has got Face ID. If this feature goes smoothly without any technical glitch on its flagship iPhone X, the brand will surely equip its next line of iPhones with Face ID. Until then, explore Touch ID and enjoy its benefits. In case Touch ID not working on your iPhone, you can follow our help guide to fix the issue.
Also Check:
- How to Set Passcode on iPhone
- How to Disable Touch ID on iPhone
- How to Send-Receive Apple Pay Cash via iMessage in iOS 11owt
- How to Setup Apple Pay Cash on iPhone
- How to Get Refund for iTunes and App Store Purchases
Do you think Apple will remove Touch ID in its next line of iPhones and iPads? Share your feedback with us on Facebook, Twitter and Google Plus.


