Touch ID is a way you send a command to your iOS device to perform some actions. And when this Touch ID is not working on iPhone 7, 7 Plus, 6s, 6s Plus, 6, 6 Plus, 5s and iPad, iOS users are disappointed. An iOS user normally uses Touch ID to unlock the device, log into apps, use Apple Pay, and buy things from iTunes and App Store.
As long as your fingerprint is working smoothly, you are on cloud nine, but when the Touch ID doesn’t respond or becomes unresponsive, you wish you had not purchased an iPhone or iPad.
So when you can’t access anything with Touch ID on your iPhone or iPad, you should perform some solutions to fix Touch ID failed to work issue.
My Touch ID suddenly stopped working on iPhone

There can be multiple reasons for Touch ID stopped working after iOS updating or resetting on your iPhone or iPad.
You should be careful about:
Successful Calibration of Fingerprint
Normally, users fail to calibrate fingerprint to use Touch ID feature on their iPhones or iPads. While calibrating your fingerprint, you need to change the positions of your thumb or finger you want to calibrate.
Put your fingers/thumb in all different positions; also ensure that your finger or thumb touches the metal ring of the scanner.
In practice, you are not going to put your finger in a perfect position; you may place it randomly. This means, you should place your finger in all possible positions during the process of calibration.
Sometimes, your iPhone case, screen protector or touch screen gloves can create trouble while you are calibrating fingerprint. Here, better remove all accessories for accurate calibration.
Use dry finger on dry Home button
If your finger is damp, you need to make it dry as bone and then place it on Home button.
Secondly, Home button should also be neat and clean. Even a little moisture on Home button would stop you from accessing your iPhone via Touch ID.
Is your finger damaged?
Apart from soft technology, if you have laid your hands on something hard and menial task, you may hurt your fingers.
And in case, you have damaged a finger with which you unlock your iPhone or iPad, the Home button may not identify your fingerprint. A piece of advice: you should register more than one finger for Touch ID.
Keep your iPhone/iPad Neat & Clean
When dust enters the Home button, it reacts weirdly. Simply keep your iPhone clean with essential accessories like iPhone cases, screen protectors etc.
Moreover, if you regularly go outdoors for biking, jogging and other adventurous activities, it is recommended that you use accessories like iPhone armbands and waterproof cases for iPhone.
Last but not the least, you must set one finger for one fingerprint as Touch ID. As far as possible, do not use multiple fingers for one fingerprint.
How to Fix Touch ID Not Working on iPhone 7, 7 Plus, 6s, 6s Plus, 6, 6 Plus, 5s and iPad in iOS 11 or iOS 10
Solution #1: Turn OFF/ON Touch ID & Passcode
Let’s start with a simple solution. Users normally setup Touch ID to unlock iPhone, Apple Pay, and iTunes & App Store. To fix the Touch ID issue, simply turn on and then turn off each option.
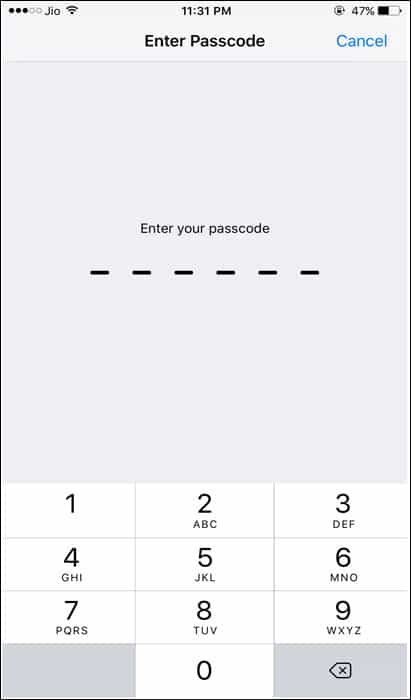
Step #1: Open Settings → Touch ID & Passcode.

Step #2: Type in your six digit passcode.
Step #3: Now toggle off each button next to the three options, i.e. iPhone Unlock, Apple Pay, and iTunes & App Store.
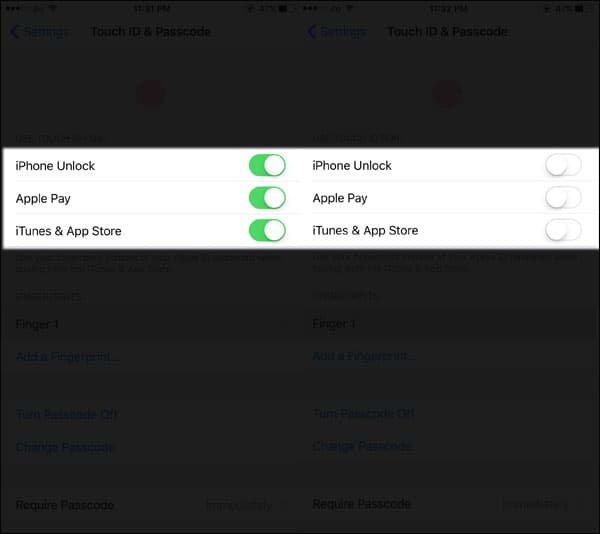
After a couple of seconds, you can turn them on.
Solution #2: Delete Fingerprint and Add Again
You can delete your existing fingerprint/s (if you have set up more than one fingerprint). This can probably solve the issue of Touch ID suddenly stopped working on your iPhone or iPad.
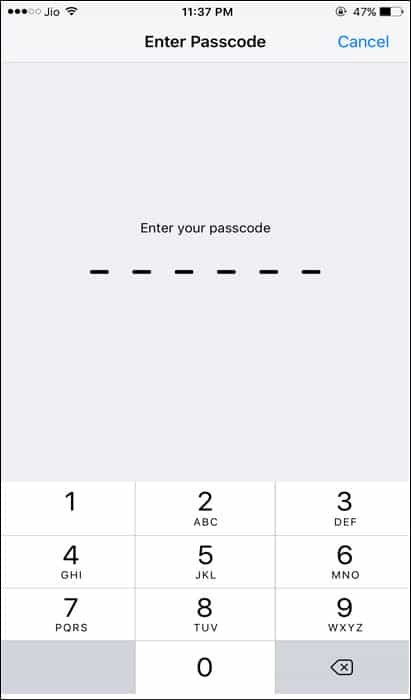
Step #1: Go to Settings → Touch ID & Passcode.
Step #2: Enter your passcode.
Step #3: Next, tap on Fingerprint 1 under the FINGERPRINTS.
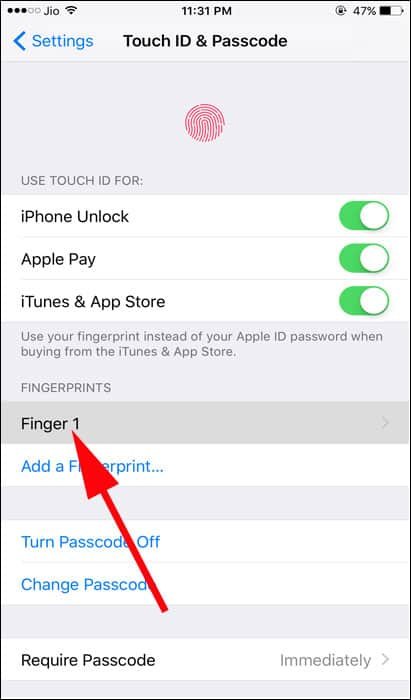
Step #4: Simply tap on Delete Fingerprint mentioned in red fonts.

It’s done. Follow the same steps for other fingerprints, if you have registered more.
Step #5: Tap on Add a Fingerprint from the Touch ID & Passcode screen.
Follow the on-screen instructions to register your fingerprint.
Solution #3: Restart Your iPhone

Restarting your iOS devices can solve many petty issues. Basically, this process fix small bugs and frozen apps apart from refreshing the device.
To restart your iPhone, press the sleep/wake (power button) button for a few seconds. Release the button when you see ‘Slide to power off’ slider appears on your iPhone’s screen.
Swipe the slider to the right side and your iPhone will be powered off. After 60 odd seconds, start your iPhone by pressing the power button again.
Follow this below mentioned guide to restart iPhone 8, 8 Plus, 7 and 7 Plus.
- Force Restart iPhone 8 and 8 Plus
- Restart or reboot iPhone 8 and 8 Plus
- Restart iPhone without home and power buttons
- Reboot iPhone 7
Solution #4: Erase your iPhone
Erasing your iPhone will completely wipe out all settings, data, apps and more from the device. And therefore, before performing this, you should backup your iPhone with iTunes or iCloud.
Step #1: Launch Settings → General

Step #2: Tap on Reset → Reset All Contents and Settings.
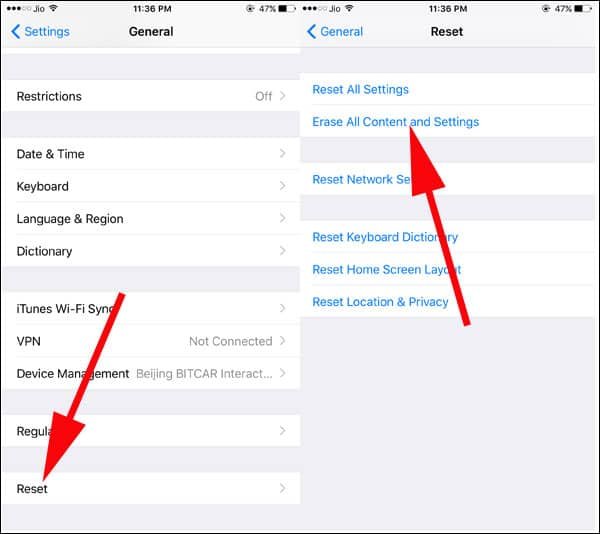
Step #3: You may be prompted to enter your passcode.
Step #4: A pop-up will swipe up from the bottom of your iPhone screen. Tap on Erase iPhone.
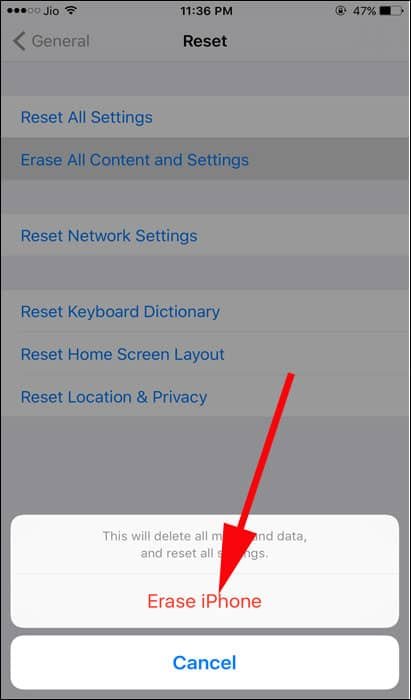
This action will wipe out all data, media and reset all settings on your device.
Solution #5: Restore Your iPhone
Restoring iPhone also deletes all your data, media files, settings, third-party apps, operating system, and firmware. Here too, you should backup data available on your iPhone.
Step #1: Connect your iPhone or iPad with Windows computer or Mac via lightning cable.
Step #2: Launch iTunes on the computer.
Step #3: On Summary page, you need to click on Restore button.
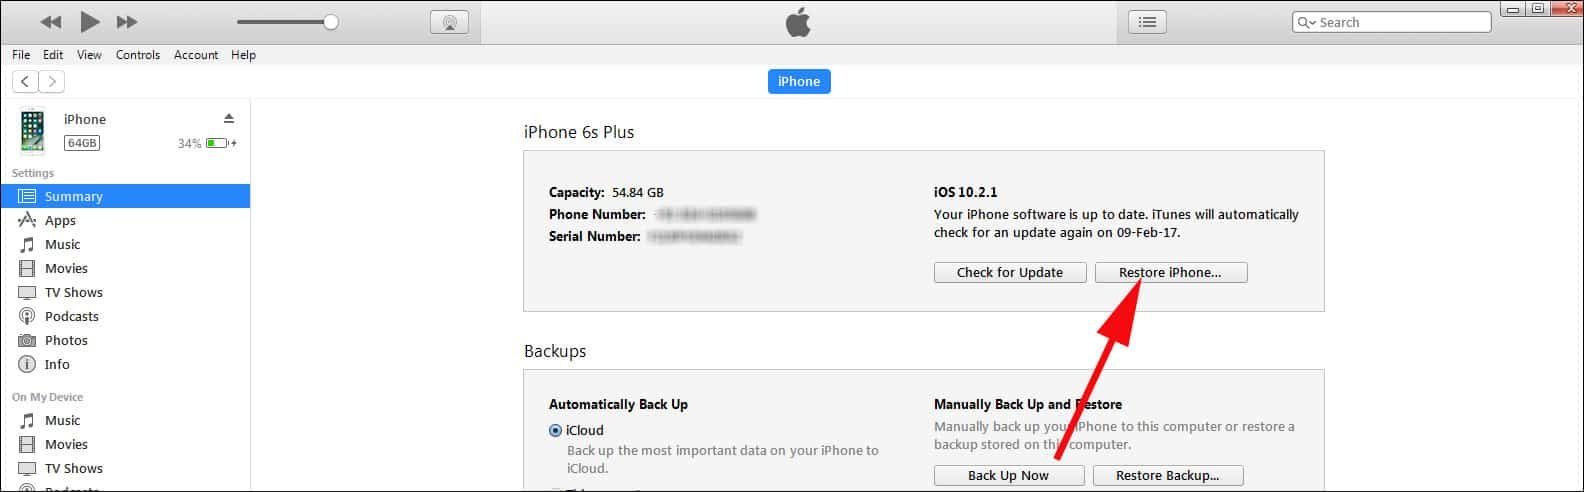
Step #4: iTunes will start downloading the firmware and then other data.
Step #5: After the process is finished, set up your iPhone or iPad as new.
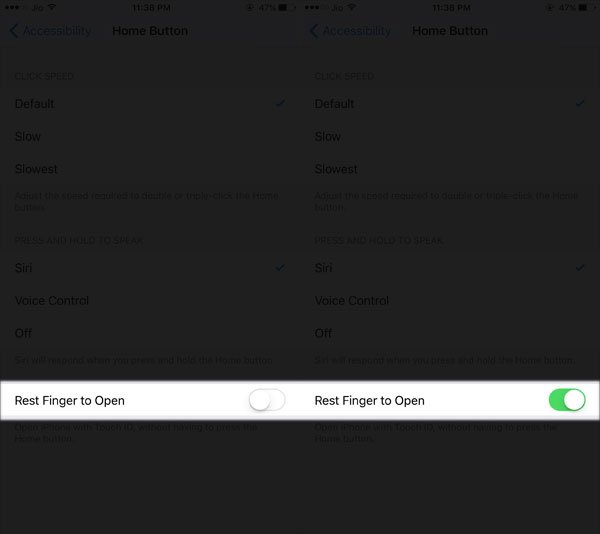
Solution #6: Turn On Rest Finger to Open
Step #1: Open Settings → General
Step #2: Next, Tap on Accessibility → Home Button from under INTERACTION
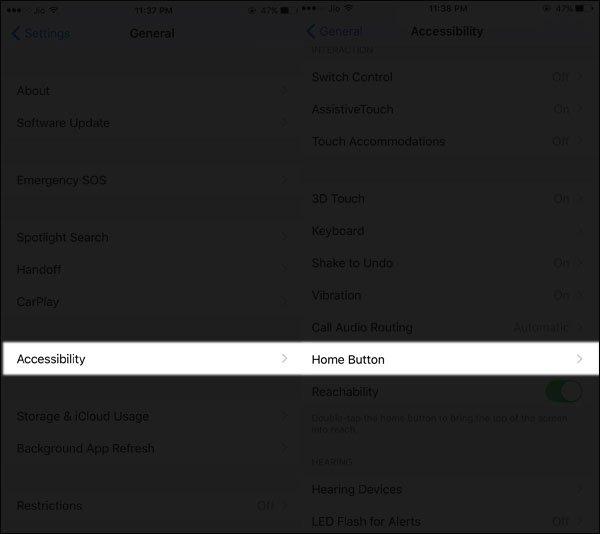
Step #3: Toggle Rest Finger to Open option ON.
Is your Touch ID Not Working After iOS 11 Update on iPhone?

iOS 11 update is must for all iPhone and iPad users as it can fix many bugs and technical issues in the device. Moreover, it improves the overall performance of your iOS devices.
But this doesn’t always give you good results; sometimes, such software updates can cause issues like Touch ID may not be working on your device.
In this situation, you can wait for a couple of days so that your device settles down after that big update. Alternatively, you can re-add fingerprint to set up Touch ID as mentioned above in Fix #2.
This information probably deals with all solutions to fix your Touch ID issue on iPhone. If the problem persists, you should immediately contact contact Apple Support or you can rush to Apple store close to your office or home.
There is a major threat in your iOS life; the worse situation comes when iPhone touch screen not working. When touch screen on your iPhone becomes unresponsive, you are trapped on a particular page or app. This is more serious a situation than Touch ID failed to work.
When Touch ID becomes unresponsive, many experts advise users to use Activator on a Jailbroken device and activate Assistive Touch. This is how you can fix iPhone home button not working issue.
Also Check:
- How to Disable Touch ID on iPhone
- How to Lock Apps Using Touch ID on iPhone and iPad
- How to Lock Notes with Password or Touch ID on iPhone
Like this guide on what to do when Touch ID failed to work on iPhone in iOS 11 or iOS 10? Share your feedback with us on Facebook, Twitter and Google Plus.