Using Paytm app on your iOS or Android device is dead simple. The app became more popular during the time of demonetization in India. With the use of this app, you can now easily make cashless transactions. So let’s check out how to use Paytm on Android or iPhone.
Basically, I love to use the Paytm app on a mobile phone as I can easily book movie tickets, bus tickets, train tickets, flight tickets etc. Moreover, I can also recharge my mobile phones using this app and sometimes I also used to send and receive payments.
Paytm service also includes utility bill payments, hotel bookings, linking Paytm with Uber, and transferring your Paytm wallet money to your bank account. Now check this exhaustive guide on how to use Paytm App on your iOS and Android phones and tablets.

How to Use Paytm App on Android and iPhone : Paytm Karo
Quick Links:
- How to Register in Paytm on Android and iPhone
- How to use Paytm Wallet on Android and iPhone
- How to Make Payment Using Paytm Wallet on Android and iPhone
- How to Add Money in Paytm Wallet on Android and iPhone
- How to Check Paytm Wallet Passbook on Android and iPhone
- How to Accept Payment in Paytm on Android and iPhone
- How to Find Nearby Shops Using Paytm on Android and iPhone
- How to Find Best Deals and Offers in Paytm on Android an iPhone
- How to Recharge or Pay mobile bills using Paytm on Android and iPhone
- How to Pay Utility Bills from Paytm on Android and iPhone
- How to Book Movie Tickets using Paytm on Android and iPhone
- How to Book Bus tickets using Paytm on Android and iPhone
- How to Book Train tickets using Paytm on Android and iPhone
- How to Book Flight tickets using Paytm on Android and iPhone
- How to Book a Hotel using Paytm on Android and iPhone
- How to link Paytm with Uber
How to Register in Paytm on Android and iPhone
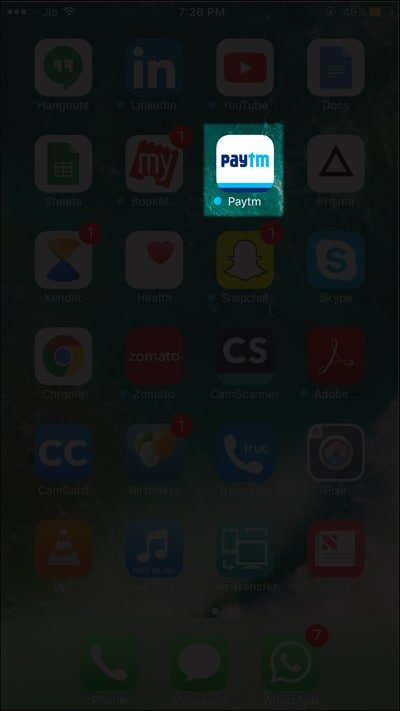
Step 1: Go to the Google Play Store or Apple App Store and get the Paytm app. You can also work with Paytm from its website paytm.com.
Step 2: Now open the Paytm app after it gets installed.
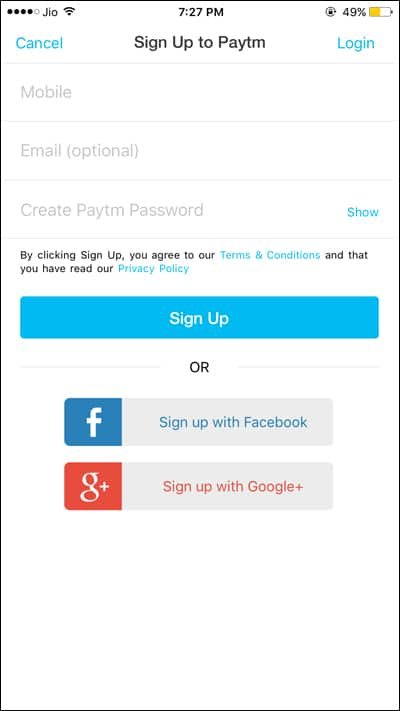
Step 3: You have to now create a new account by putting in the needed information as asked by the app. You can also do the Paytm registration through your Google or Facebook account. After filling up the information, touch ‘Sign Up’.
Once this is done properly, you get successfully registered with Paytm and then you can begin utilizing its services.
How to use Paytm Wallet on Android and iPhone
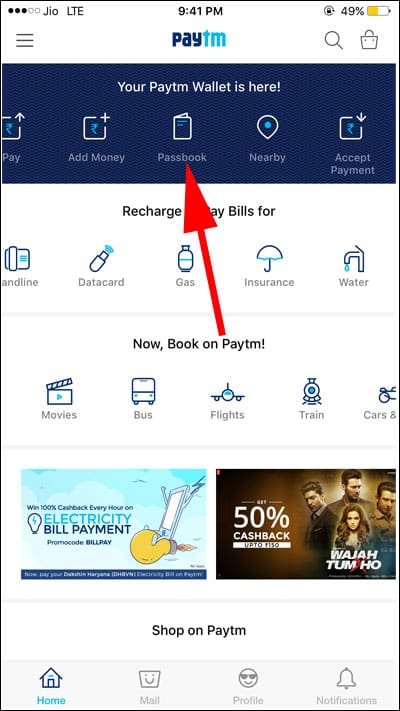
You will be able to see and read on the top of the home screen of your Paytm wallet app, “Your Paytm Wallet is here!”
Know how you can use this Paytm Wallet and 6 different purposes for which you can use it.
Option 1: Pay Money
If you have already added money to your Paytm e-wallet balance, you are now equipped to pay it to other Paytm users and to those stores and business entities possessing Paytm QR Code. Use the following steps to know how to remit money using Paytm e-wallet.
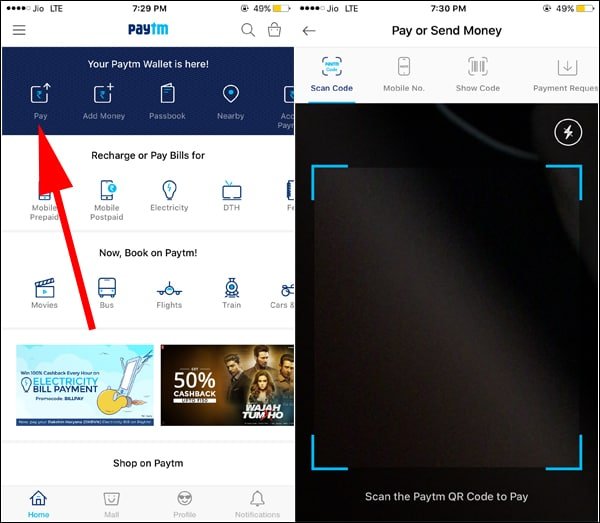
First, touch ‘Pay’ on your Paytm app’s wallet. You can now view four distinct choices: Scan Code, Mobile Number, Show Code, and Payment Received.
Scan Code:
When you come across a Paytm QR code at any business establishment or when hiring an auto, cab or even with a hawker, you can use your wallet to pay. Just touch the ‘Scan Code’ option and you will see it begin scanning the code immediately by itself. After this is done, you will then be prompted to input the amount that you want to pay from the wallet. Just put in the figure and touch on ‘Pay’ and the payment will be done.
Mobile Number:
You can input the mobile number of any other Paytm user, say a friend or a family member, and then put in the amount you desire to transfer to him or her. You can also optionally input the cause for transferring the money. After filling the mobile number and the amount, touch ‘Send’ to transfer the money straight to the chosen Paytm user.
Show Code:
The Code scanner is present with some of the businesses and merchants helping them to get the payment. Touch the ‘Show Code’ option and give your mobile to the merchant. The merchant will then scan it and input the amount that is denoted in the bill. After scanning, the due bill amount will get straightaway transferred from your Paytm wallet. For security reasons this code keeps getting refreshed and updated each minute.
Payment Request:
Scheduling your payment can also be done with this service and those scheduled payments will be itemized under this option.
Please Note:
In case your Paytm wallet is linked with your bank account or your credit or debit cards, then you can select that option when you have less or nil balance in your wallet.
Option 2: Add Money
Logically, adding money is probably the first thing you would do on the Paytm app as with no money added you won’t be able to work with the different Paytm services or know how to pay money using the app.
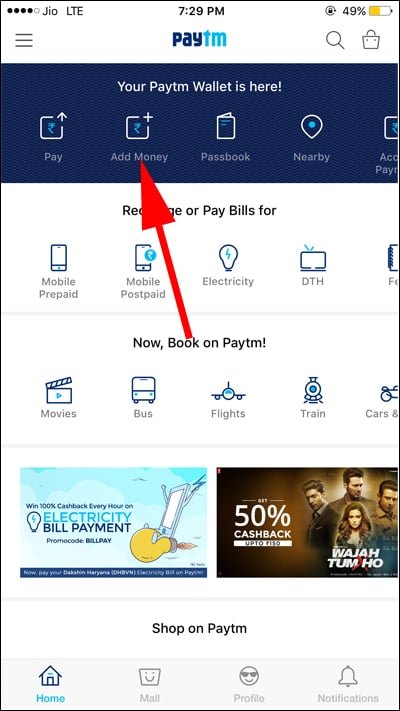
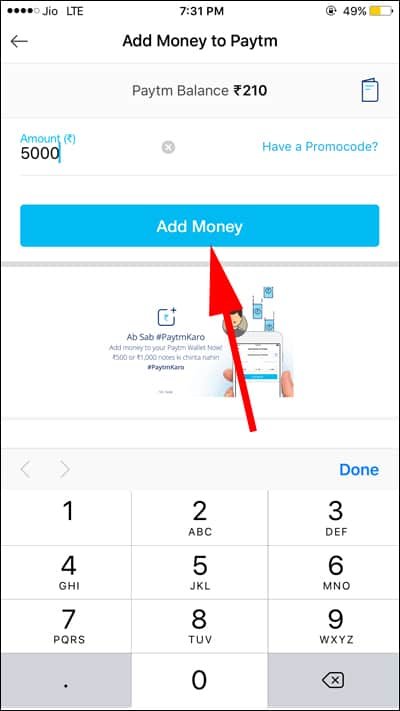
Step 1: Touch ‘Add Money’ that is present as the second option.
Step 2: You will now be prompted to put in the amount that you wish to add to your e-wallet. Therefore input the needed amount and touch ‘Add Money’.
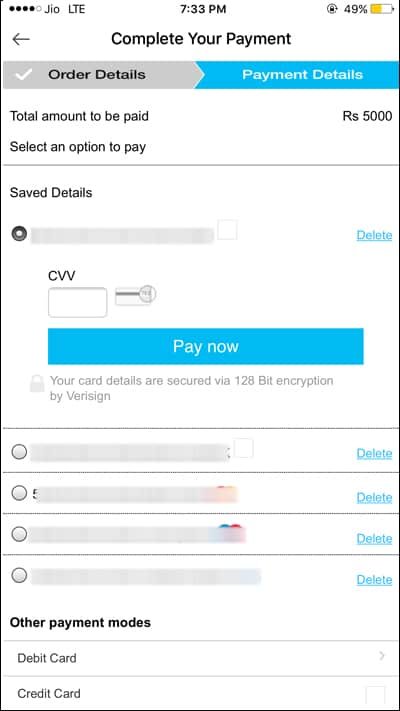
Step 3: After that you will get directed to ‘Complete your Payment’. Here you will find different options that can be utilized to add money to your e-wallet. These include
- Debit Card
- Credit Card
- Net Banking
- ATM Card
Pick the suitable choice from the above and complete the process.
Please keep in mind the following points:
If you have selected one of the Debit, ATM or Credit Card options, then for your debut payment that you are making through Paytm, the app will prompt you on whether you wish to save that card or not. Saving the card is handy as it helps you for adding money in the future without having to keep your card with you. However, the CVV number won’t be saved for safety purposes and you will need to have it in your memory every time.
In case you wish to terminate the payment, just touch the back arrow that’s present on the top left corner of your screen or your capacitor buttons on the mobile itself. After doing this, you will be asked to confirm your action. Now, just touch “Yes” to terminate the process. The money that you have added to the wallet will remain there and won’t get transferred back to your bank account or credit card automatically as there is a different procedure to do that. According to the recently updated RBI guidelines, you can add a maximum of Rs. 20000 each month to your Paytm wallet.
Option 3: Passbook
The Passbook section helps you view all your incoming and outgoing Paytm transactions. These include dates just as you have in your regular bank passbook. You also get to go through the refunds from different Paytm offers laid out here. You can also see the amount that you have used from the permitted limit which is also visible here.
Option 4: Accept or Request Money
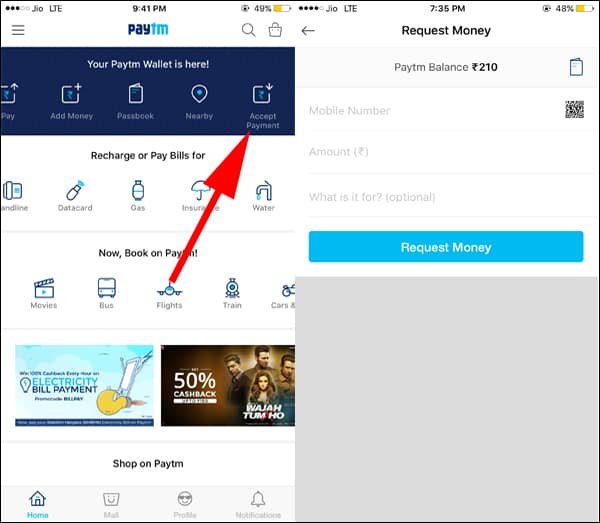
Paytm lets you directly get money from another Paytm user by using the Accept or Request Money option. If the person sending the money is present with you then you just have to touch the ‘four squares’ image next to the mobile number within this option. Then the sender can scan your generated QR code and transfer you the preferred amount. This can also be done by inputting the mobile number of the sending person and the amount needed and then sending a payment request directly to him or her.
Option 5: Nearby
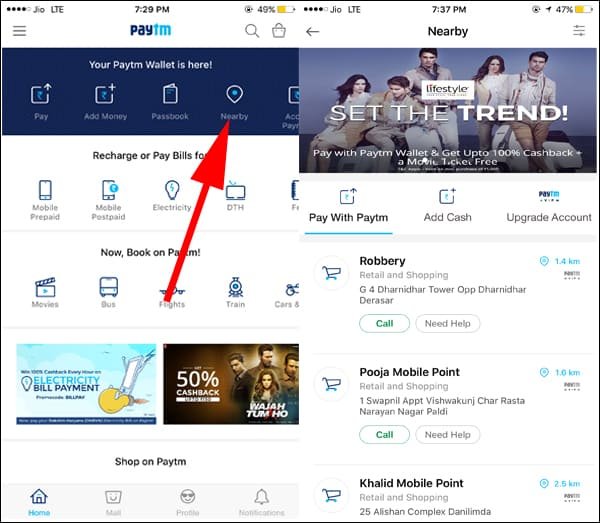
Pay with Paytm: This will list all the merchants that take payments by Paytm in the nearby area where you presently are, along with their working hours. This helps you do your shopping using your Paytm wallet.
Add Cash: In case you find yourself depleted of cash, you can find the banks in the nearby area listed in this section. You can simply visit the bank listed here to put in money in your e-wallet. The banker can scan your code and add your needed amount in your Paytm wallet.
Upgrade Account: Like we mentioned above, the present limit to add cash to your Paytm wallet per month is Rs. 20000. However, if you have the need for an unlimited account usage, then you have the option to get that. You will have to present your KYC documents to Paytm. You can ask for a Paytm representative to visit your place and take care of this process. You can also submit the documents by using this ‘Upgrade Account’ option. Just touch this option and you will immediately get to know the location of the nearby Paytm partners. You can then visit there and complete the KYC formalities to become a Paytm VIP member. Usually Paytm partners visible here are located within a 2-2.5 km radius.
Option 6: Deals
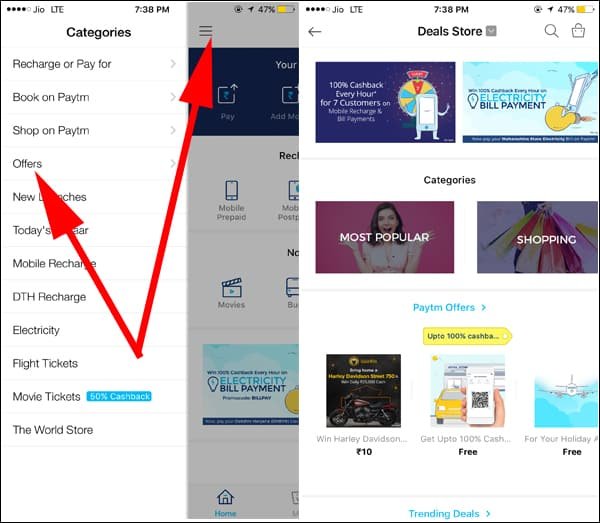
Here you can discover the latest deals, offers and discounts available in your city segregated across different categories. You will also find exclusive deals primarily for Paytm users only. Please keep in mind that these offers get refreshed and updated daily and at time even earlier. Therefore, to get maximum benefit from these deals, make sure you keep checking out this section frequently.
How to Recharge or Pay Mobile Bills using Paytm on Android and iPhone
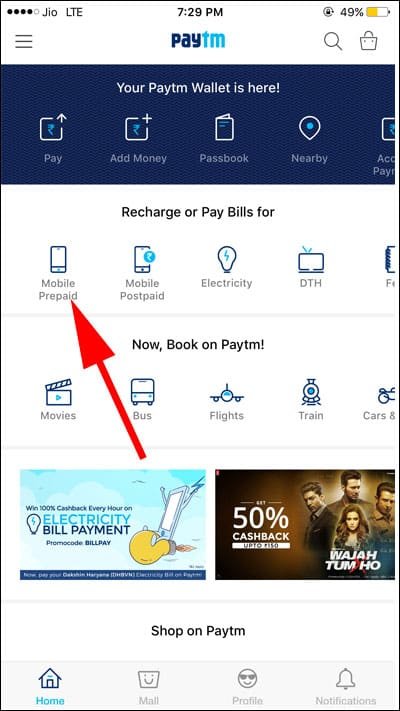
Step 1: Touch on ‘Mobile Prepaid’ option present on the Paytm app home screen or you can touch the three horizontal lines present on the top right of your mobile screen to get to the menu and then touch ‘Mobile’.
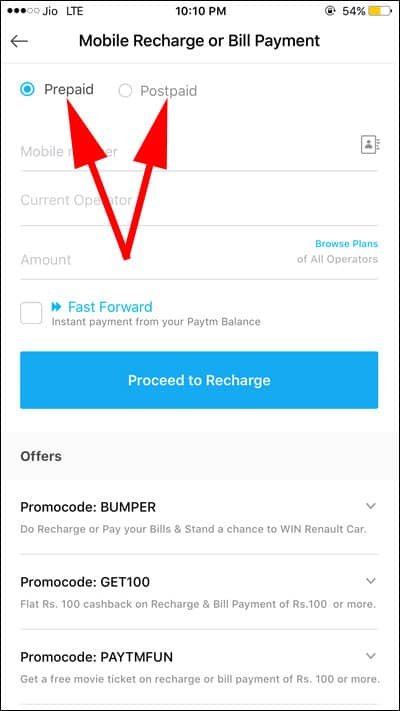
Step 2: Choose Prepaid or Postpaid. If you are looking to recharge your mobile balance, you will be able to see a number of offers and special plans below the ‘Proceed to recharge button’. Choose the one which you want.
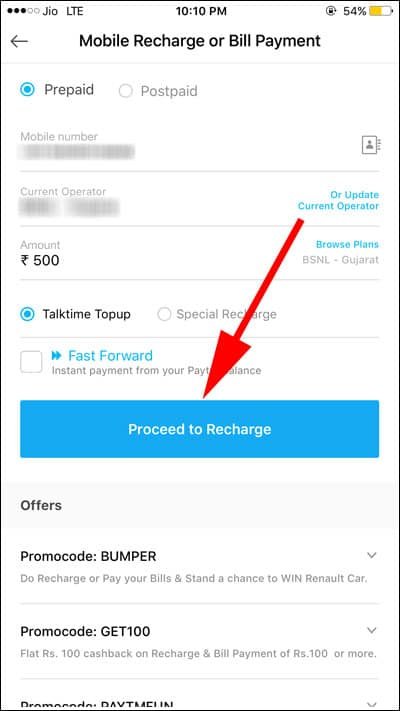
Step 3: Input the mobile number, current operator and amount and tap on ‘Proceed to Recharge’.
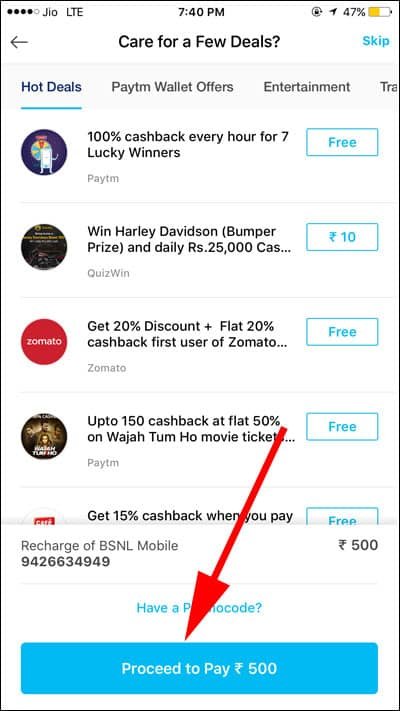
Step 4: You will get prompted to choose any of the Paytm offer coupons. If you want to pick one you can do so, but this amount will also get added to your recharge amount. If you don’t want to add any coupons then touch ‘Skip’ or ‘Proceed to Recharge’.
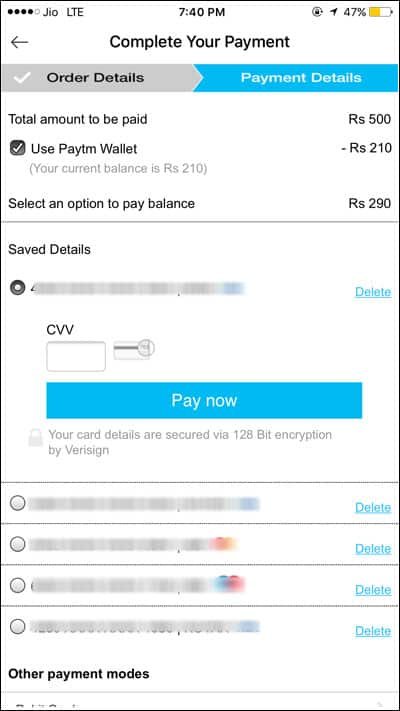
Step 5: Now you will be able to remit the recharge amount or the billed amount straightaway from your Paytm wallet or by selecting a preferred Credit, Debit or Net Banking option.
Once you have recharged or paid bill for the first time, your mobile number will be stored by Paytm and this will be displayed to you again when you go in for the next recharge. This helps to cut down time taken during the process.
How to Pay Utility Bills from Paytm on Android and iPhone
In the ‘Recharge or Pay for’ section or in the menu under the three horizontal lines on top, you will be able to see a number of different utility services such as Gas, Electricity, etc. You can select any of these services and do bill payment for those using the same steps as detailed above for recharging your mobile. You will get discounts and offers from time to time for paying these bills from Paytm by receiving a promo code beforehand via SMS.
How to Book Movie Tickets using Paytm on Android and iPhone
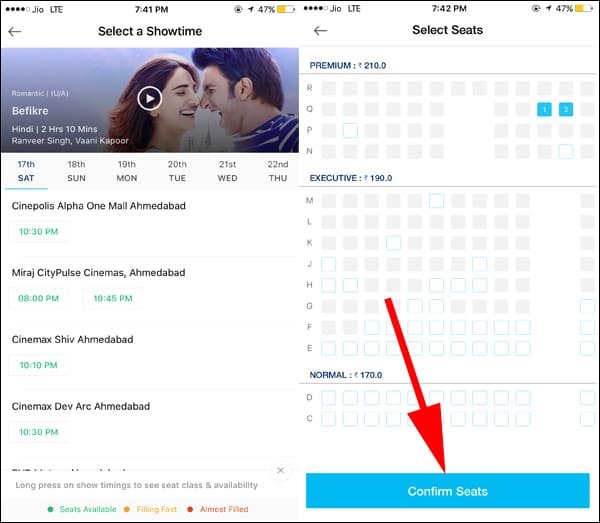
Paytm provides a number of huge discounts on movie tickets with every Indian or Hollywood movie release. These discounts vary from 10% to a completely free ticket with an upper limit of Rs. 150. So start booking your movie tickets with Paytm using the following steps.
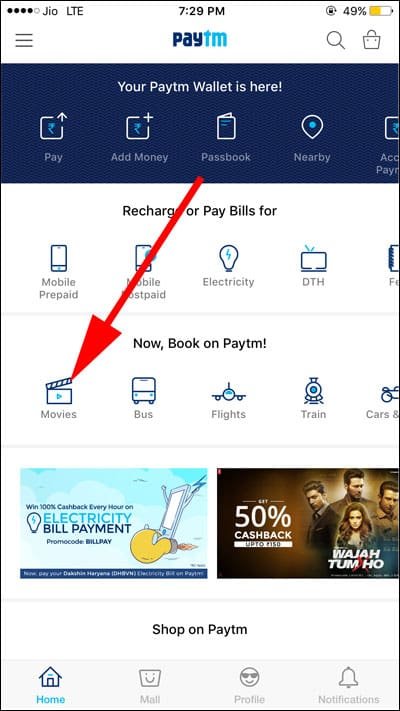
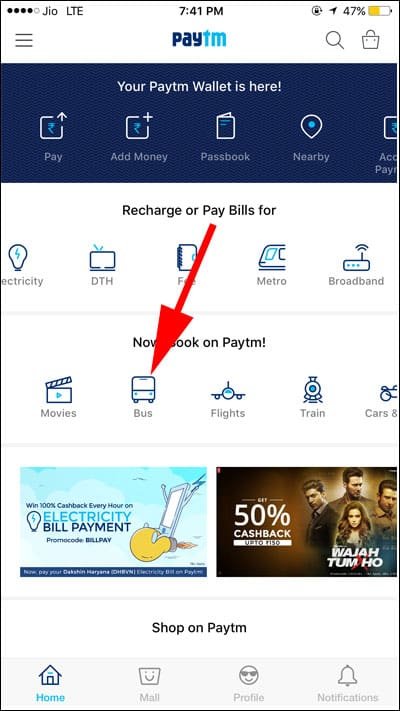
Step 1: Locate ‘Now Book on Paytm’ option on the home screen. In this section, you can see the ‘Movies’ option, just touch that.
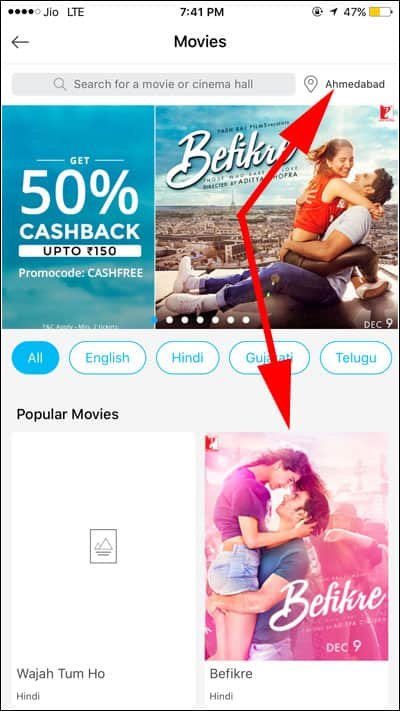
Step 2: Now select your location and pick the movie that you want to watch.
Step 3: Pick the time, date and theater of your preference. Now, you will be asked to choose the seats that you desire. Just proceed.
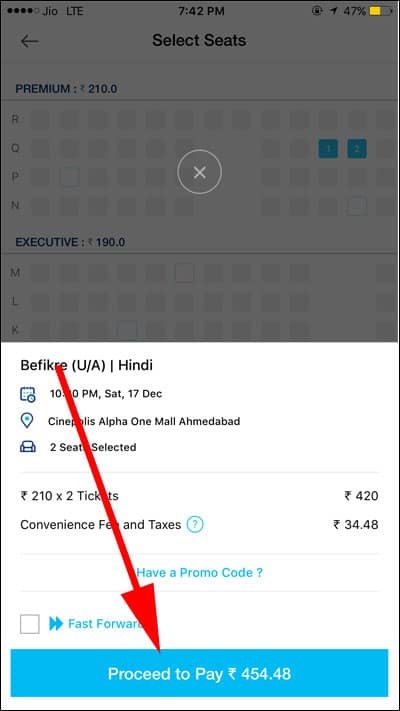
Step 4: Prior to paying, just touch on ‘Do You Have a Promo code’ option. Now, you will discover a host of discounts and special offers for a specific movie. Select the suitable promo code to enjoy topmost discount for your ticket.
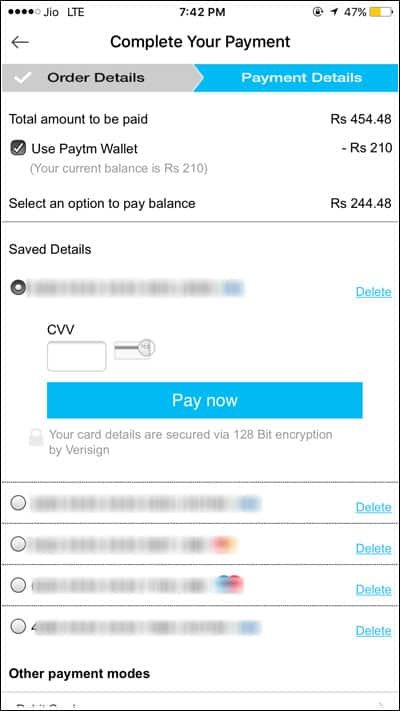
Step 5: After that proceed to pay directly using the Paytm wallet or via Net Banking or Credit and Debit Cards.
After payment, you will get the SMS and email with all the details of your movie ticket with the Kiosk ID. You can show this message at the booking window for physical tickets or you use the Kiosk at the cinema hall to print it yourself.
How to Book travel tickets using Paytm on Android and iPhone
Bus tickets:
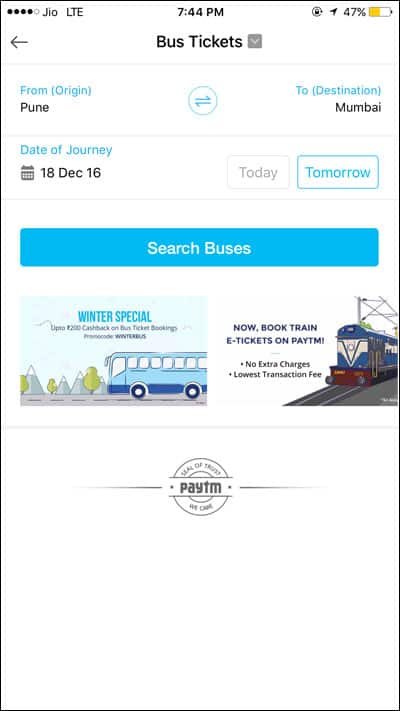
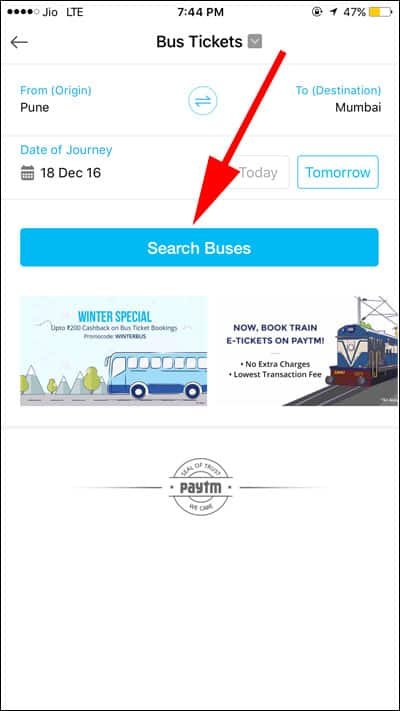
Step 1: On the home screen touch ‘Bus’ option.
Step 2: Choose the place of origin and destination along with the travel date.
Step 3: Touch ‘Search Buses’.
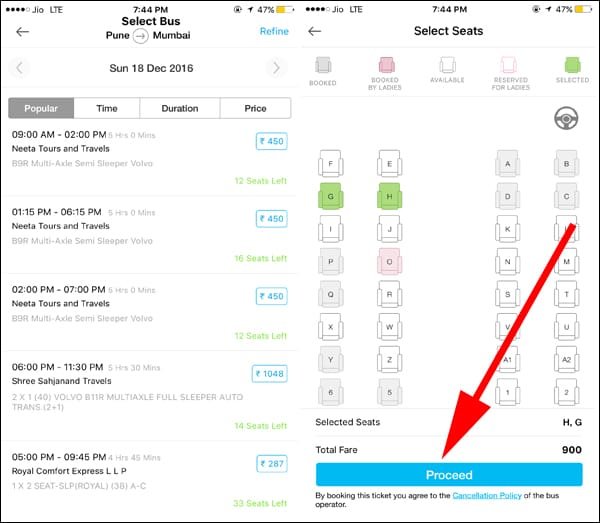
Step 4: You get the choice to sort out using parameters such as popularity, time, duration and price. Touch the option that suits you. Now, pick the seat number and go ahead with the payment.
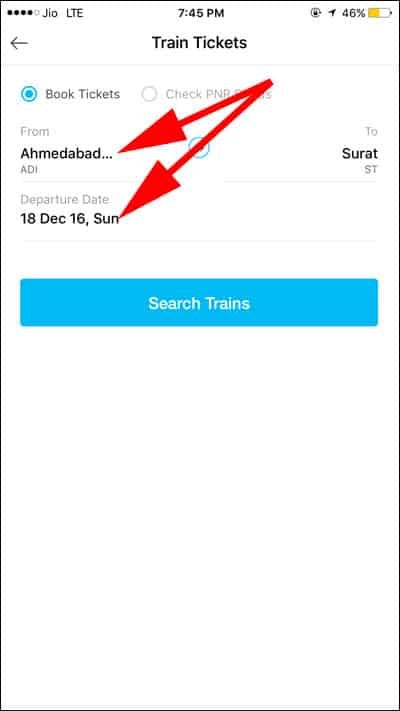
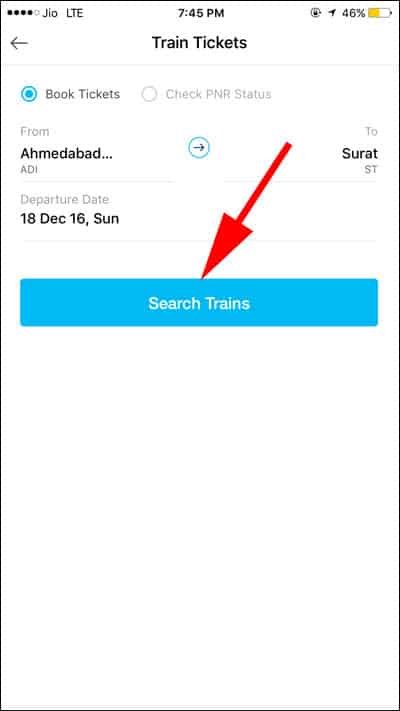
Train Tickets:
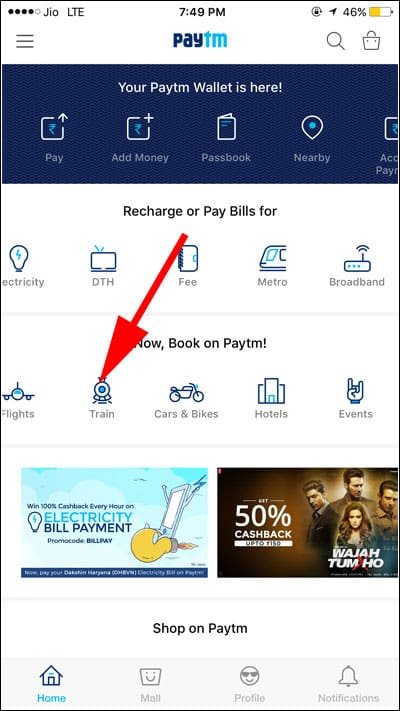
Step 1: Touch on ‘Train’ option on the home screen.
Step 2: Choose the place of origin and destination along with the travel date.
Step 3: Touch ‘Search Trains’.
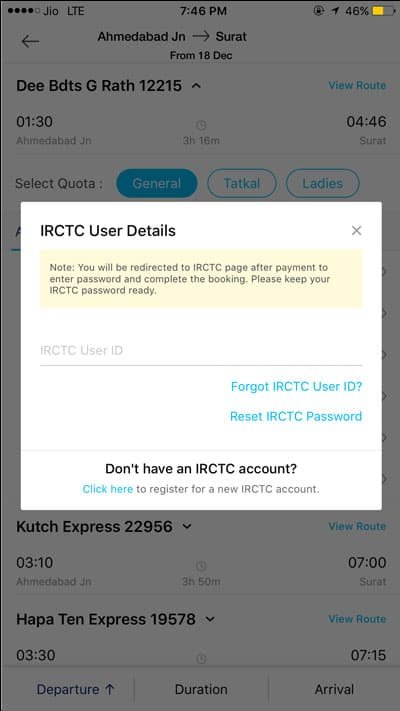
Step 4: Now you get to sort out using filters such as Departure, Duration and Arrival at the bottom of your screen. Pick the train that matches your travel plan and class such as Sleeper or AC 3 tier, etc.
Step 5: Check out the availability information (available or Waiting List) detailed just below with every train names before moving to next step.
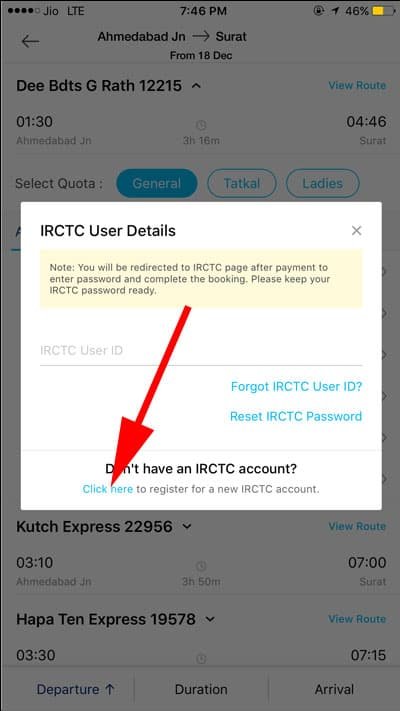
Step 6: Now you will be asked to enter your IRCTC details. Do that and go on to complete the process with payment.
Note: If you don’t have an account with IRCTC then you can even open a new one on Paytm app by tapping on ‘Click here’.
Flight Tickets:
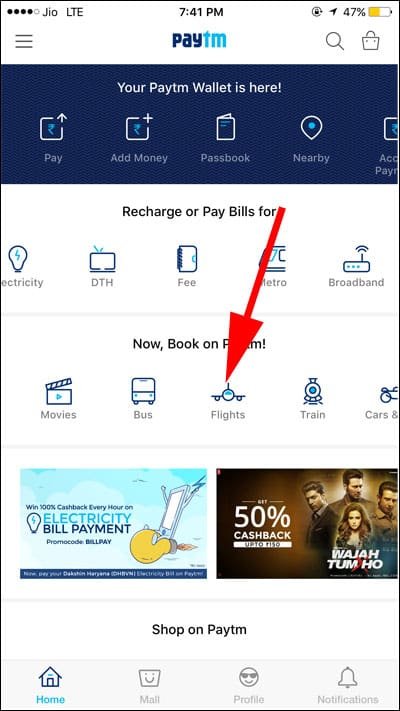
Step 1: Touch ‘Flights’ option on the home screen.
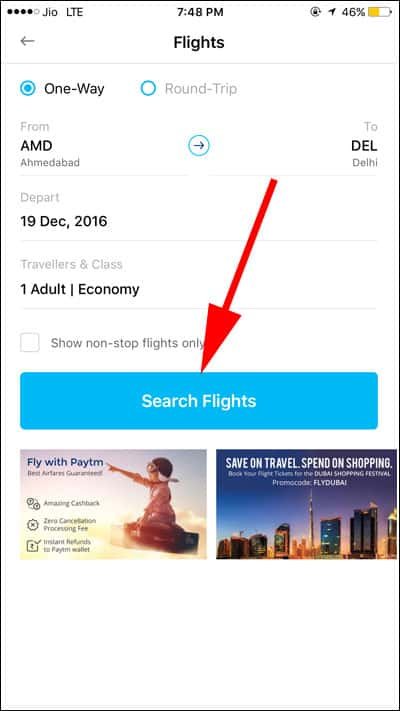
Step 2: Choose one way or round trip option along with the place of origin and destination. Also, choose the travel date and number of passengers along with the desired travel class.
Step 3: Touch ‘Search Flights’.
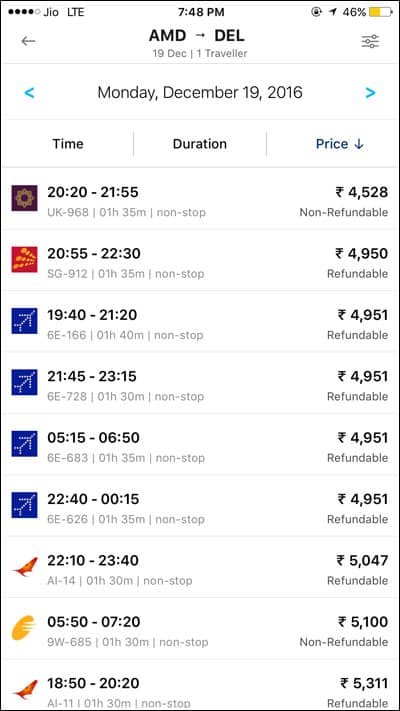
Step 4: You will see a list of flights laid out and you can pick the suitable flight using filters such as departure time, price and duration.
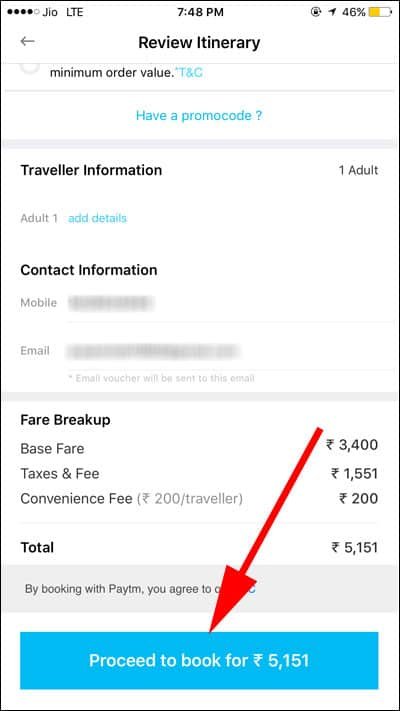
Step 5: Now input the passenger details and go ahead with your payment.
Hotel Bookings:
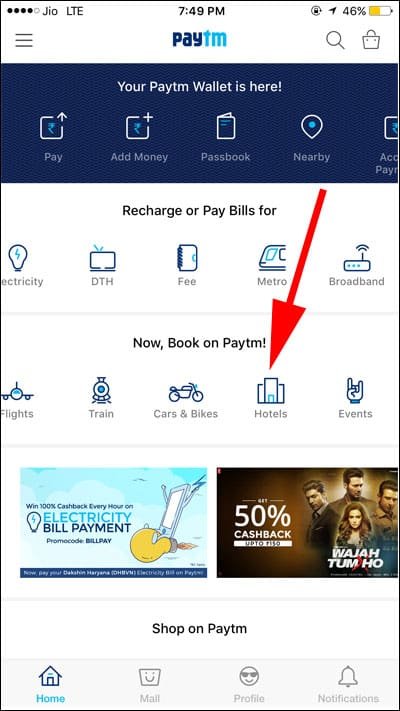
Step 1: Touch ‘Hotels’ on the home screen.
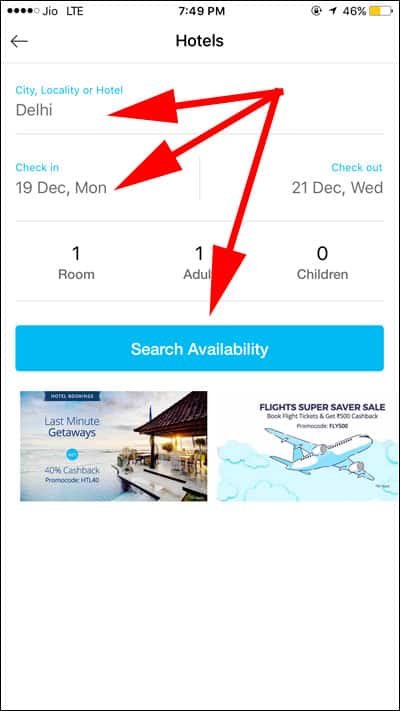
Step 2: Choose the destination. Then select the check-in and check-out dates. Select the number of rooms needed and details about the number of adults and children for the stay. After this, just touch ‘Search Availability’.
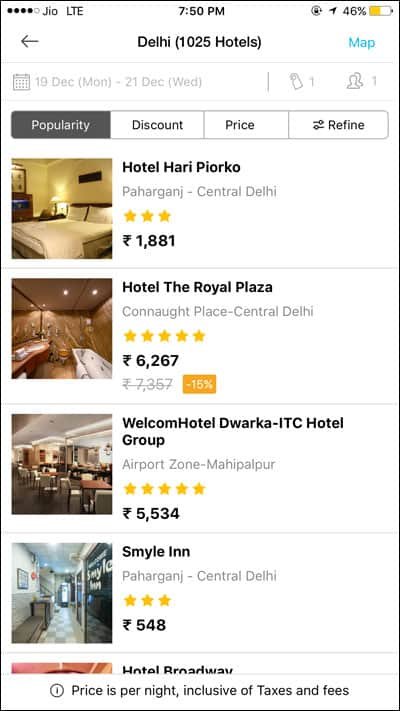
Step 3: Now you will see a list of hotels which you can filter by popularity, discount and price. Touch the hotel that matches your budget. You are also able to adjust price range by using the up and down arrow key next to the ‘Price’ option.
Step 4: Go ahead with payment.
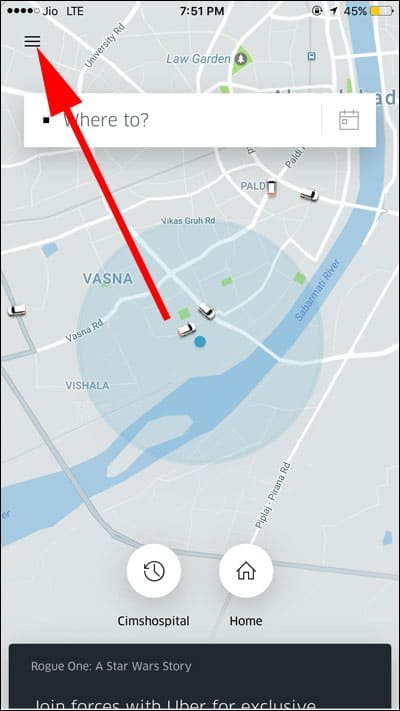
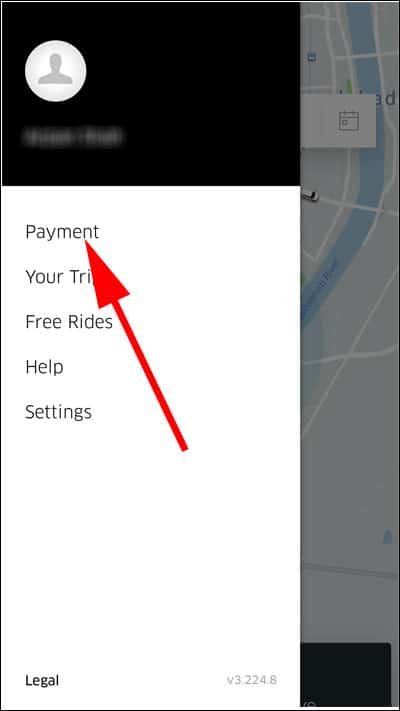
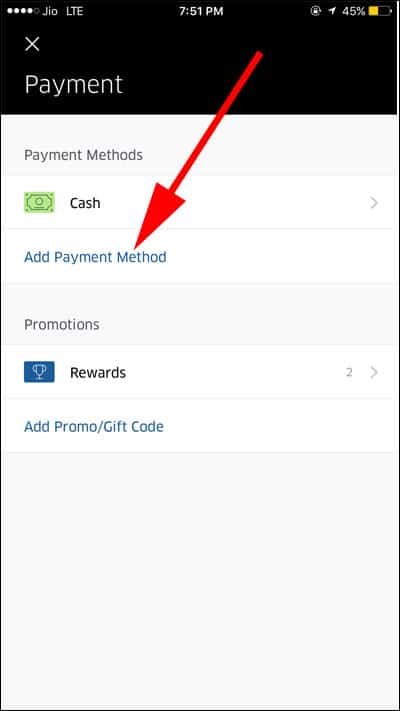
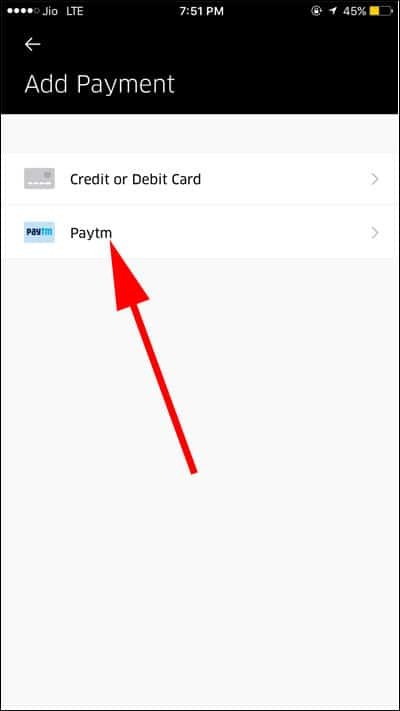
How to link Paytm with Uber
This is one of the most popular uses of Paytm wallet. You don’t have to pay cash for your Uber ride every time. Instead, you can just attach your Paytm e-wallet with your Uber app and pay for your ride.
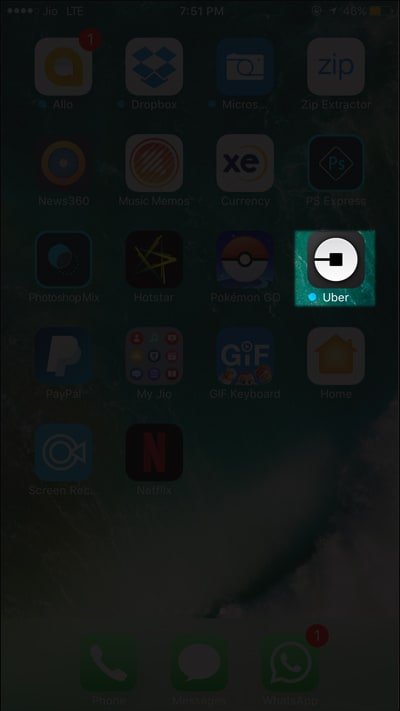
Step 1: Open the Uber app.
Step 2: Touch on the three horizontal lines on the top right corner.
Step 3: Tap on ‘Payment’.
Step 4: Touch ‘Add payment Method’ option.
Step 5: Select Paytm.
Step 6: Now you will get an OTP (One Time Password) on your smartphone and registered email from Uber. Use this OTP to finish the linking process properly.
Points to Remember:
- It is recommended to maintain the same mobile number and email address for both Paytm and Uber accounts to have a trouble free linking and future usage.
- According to the present policy of Uber, you must have a minimum balance of Rs. 200 in your wallet for booking a trip.
- On booking a new trip you will get shown your present Paytm wallet beneath the map. In case you don’t wish to pay from your Paytm wallet, tap on Paytm logo and you will be able to change the payment option.
- You can also modify the payment option directly by navigating via the menu and then to ‘Your Payment Methods’ and then tapping on ‘Cash or Credit/Debit card option’.
- Uber provides a range of discounts frequently if you keep using Paytm as a payment option. You can get up to 25% discount or Rs.50 whichever is higher on each trip or a specified number of trips in a week if you continue using Paytm as a payment option.
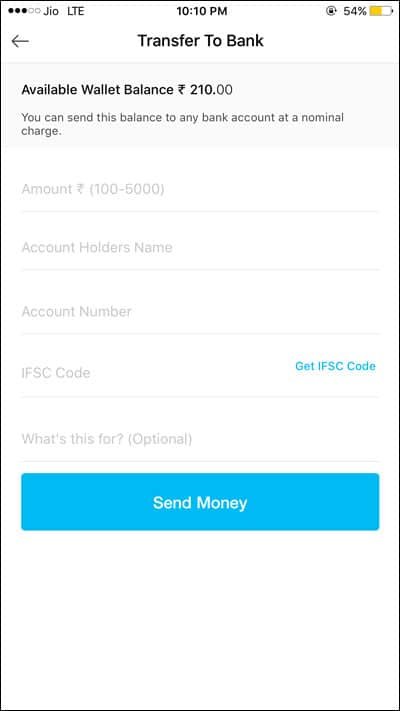
How to Transfer Paytm wallet money to your Bank Account
You have the option to transfer your Paytm wallet money to your Bank Account, but to do these certain criteria have to be met and you also incur a charge of 4% of the transaction amount. Following are the conditions involved,
Conditions:
- Your Paytm account must be registered for at least 45 days before through mobile or email.
- Your Paytm wallet balance must be Rs. 2,000 or more.
- The transaction amount must be more than Rs. 1,000.
- Daily transfer limit from Paytm to Bank Account is Rs. 5,000 and monthly limit is Rs. 25,000.
If all the above conditions have been met, then you can go ahead with transferring your Paytm wallet amount to your Bank Account.
Step 1: Open the Paytm app.
Step 2: Tap on Passbook.
Step 3: Tap on Send Money to Bank
Step 4: Input the details such as Name of the account holder, the name of the bank, etc.
Step 5: After that you will need to type in the IFSC code. To get this, provide the information about your city, bank branch, state and then touch ‘Submit’.
Step 6: You will get an SMS on your mobile with the following message content,
“Your wallet is not set up to transfer money to the bank. To use this service SMS TMB to 53030 from your registered mobile to get an invite.”
Follow as instructed above to activate balance transfer from Paytm to your Bank Account. After this, you will get the confirmation message. There will be a probable waiting period of at least 2 to 7 days to activate this facility depending on the banks involved.
Note: – Recently Paytm started their offline service. If you don’t have internet service on your iPhone and Android, do not fret as you can still use Paytm; just call on this toll-free payment number (180018001234).
Also Read:
- How to Make WhatsApp Payment from Android and iPhone
- How to Send Money via PayPal from Skype on iPhone and Android
In today’s situation Paytm is a very handy digital wallet system and hence we have taken this effort to provide you a complete guide on how to use it on your smartphone. After reading our guide you should find it easier to use Paytm, but if you still have any doubts do let us know and we will be happy to clear them. How important do you find the Paytm e-wallet system? Share your feedback with us on Facebook, Twitter and Google Plus.
