Photos for Mac not only helps you store your memories but also assists you in printing photos of your choice. You can catalog your happy moments, and then edit them; but what if you want to see those moments in prints. Well, here is how to order prints in Photos on Mac.
Ordering high-quality photo prints are the best way to store those unforgettable moments forever. Moreover, getting prints of your photos is a nice way you can send a gift to people you love. This service from Apple doesn’t come free; but when memories are linked, who cares about money? So here is how you can order prints from iPhotos.
How to Order Prints in Photos for Mac
Step #1: Open Photos app by double-clicking the app.
Step #2: Next, you are supposed to select photos you want to order prints for.
Want to choose multiple photos? Just hold down the command key and select photos.
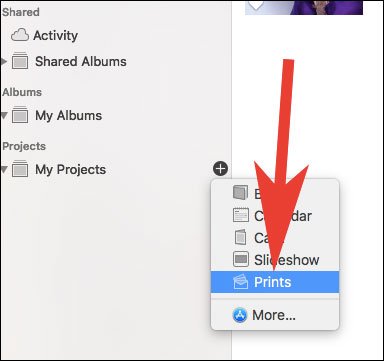
Step #3: Now you need to click on Add (+) button next to My Projects seen in the sidebar.
That (+) button will be hidden until you hover your mouse there on My Projects.

Step #5: You would like to choose print options like Auto-Sized, Traditional, Square, and Poster. Click on Select and choose any one option.
Step #6: It’s time to add some aesthetic elements to your photos.
When you double-click any photo, it will launch the Photo Options window, and you can apply a filter, change the cropping and zoom level; you can also edit your photos.
Add white borders to your photos or apply glossy finish at the top right corner.
Remember, if you apply white borders to your photos, you won’t be able to choose Auto-Size prints.
Next, you can mention how many copies you want to order for prints. For this, click any photo to select it; next, click the Options button from the toolbar and enter the number of copies.
You can place more photos in your order; for this purpose, you have to click the Prints button from the toolbar and choose Add Photos. Next, select the photos you want to add and click Add.
To change the print size of photos, simply click Prints button (from Toolbar) and then click Change Size; now select the size.
You can also change the size of an individual photo; for this, you have to select the photo first and then click the Prints button from the toolbar.
Want to add more print sizes? Click Prints button from the toolbar and choose to Add Another Size. And then choose the additional print size.
In case you wish to add another size to photos, choose the photo and click the Prints button from the toolbar.
If you hit the Cancel Order button by mistake, your Mac will ask you to save the changes so that you can come back to your order later.
When you have done all the essential edits, click Order Prints button.
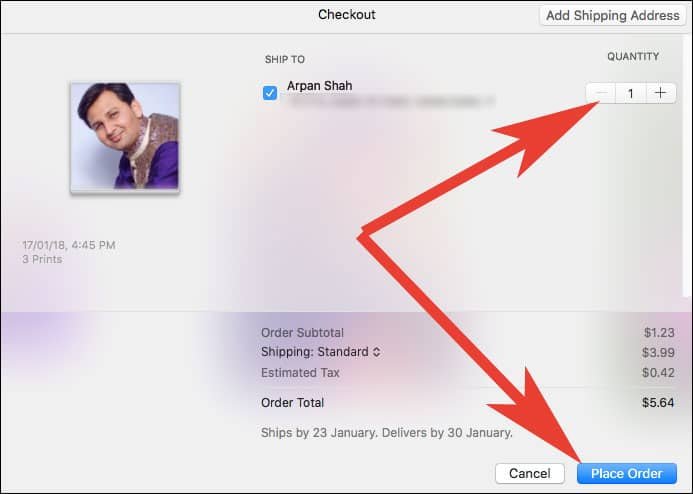
Step #7: Now you will be prompted to agree with terms and conditions. You need to click on Add Shipping Address button from the top right corner.
Don’t forget to mention Quantity of photos, in case you want to share your memories with many people in your social circle.
You may choose either standard shipping or express delivery. The app will display the estimated delivery date in Checkout window. Finally, click on Place Order button.
In the last, you are required to enter your Apple ID and password to confirm your order prints.
That’s all friends!
Once you receive your photos, you can share them with others. And leave your comments in the section below.
Also Read:
- How to Transfer iPhone Photos to External Drive on Mac
- How to Take FaceTime Live Photos on Mac
- How to Record FaceTime Call on iPhone and Mac
- How to Create GiFs on Mac
- How to Record Screen with Audio on Mac
- Best Laser Printers for Mac
- Best Inkjet Printers for Mac
- Best AirPrint Printers
- Best Photos Printers
- Best Printers for Mac
If you like this feature, share your feedback with us on Facebook, Twitter and Google Plus.


