Unless you are using an updated version of iOS, probably iOS 12 or later, you must be facing a lot of difficulties in removing a custom ringtone from your iPhone. However, iOS 13 and later has made removing custom ringtones from the phone a lot easier and smoother. It’s simple to add ringtones to the phone and even simpler to remove it.
Let’s find out how to delete ringtones from iPhone. Although it may sound difficult to remove ringtones from iPhone, in reality, it’s a piece of cake. Let’s find out!
How To Delete Ringtones from iPhones
Basically, you can’t remove default ringtones from your iPhone. The system-generated ringtones are the default ones you find on the phone, and these are non-removable.
Only the tones that you download from the internet or the music that you play as a ringtone can be deleted. Here are three ways you can delete ringtones from iPhones.
1. Remove Directly From iPhone

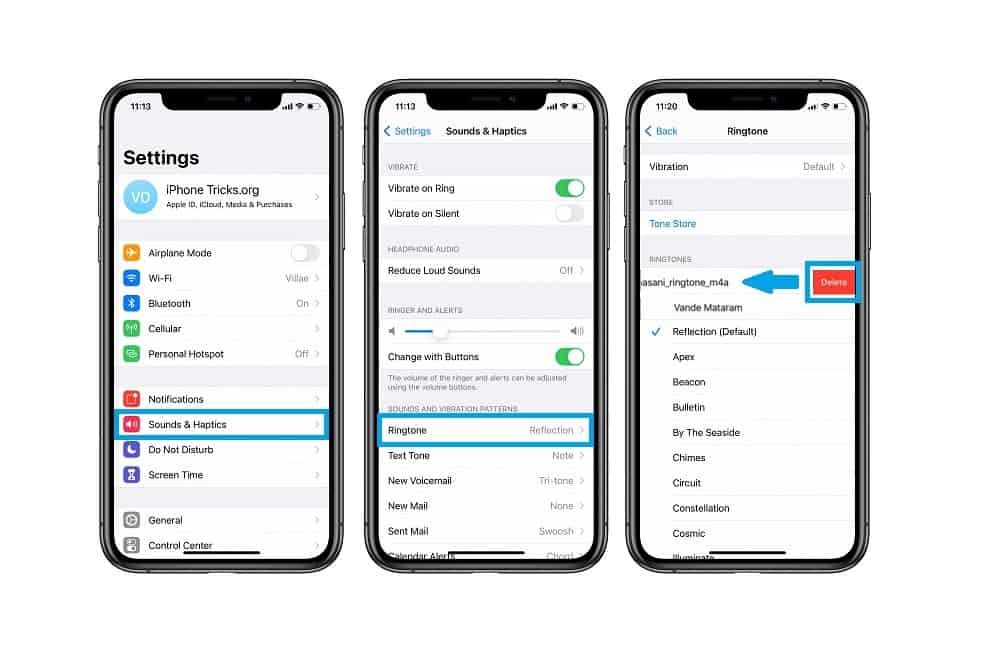
As we mentioned earlier, it’s pretty easier to remove ringtones from iPhone if you are using iOS 13 or later. To remove ringtones, you need to go to Settings and find the ‘Sounds & Haptics’ options on it. Tap on the option and select ‘Ringtone’.
Here you will find all the ringtones that your iPhone stores. Now scroll up and down to find the ringtone that you want to delete. Once you find it, tap and hold onto the name and swipe left. This will reveal a red ‘Delete’ option.
Click on the Delete option, and the ringtone will be deleted from your phone, just like that. You can check the option for the default system ringtone, and you will notice that this deleting option won’t be visible for those ringtones. That’s why system ringtones are non-removable.
How to Get iPhone X Reflection Ringtone on Any iPhone
2. Use iTunes to Delete Ringtone

Another way you can remove a custom ringtone from your iPhone is to use iTunes on your computer. It’s a manual job, but if you are connected to the computer more than your phone, it may come as handy to you.
To do this, open iTunes on your computer and connect your iPhone via a USB cable. Now, go to the Tones option on iTunes. Here, you can find a list of ringtones that are available on your phone. Remember, this list will show all the ringtones, including the custom ones that you have downloaded through iTunes.
Scroll down to the desired ringtone and press the Delete button on your keyboard. This will prompt a dialogue box that gives you the option to confirm if you want to remove the ringtone. Select it, and the ringtone will be removed.
Now, after you confirm the removal, there will be another dialogue box named ‘Keep file’ that will ask if you want to keep the file on your computer. If you select Yes, the file will be on your computer but not on iTunes.
3. Use iTunes to Sync Necessary Ringtones
Another way to get rid of unwanted ringtones from your iPhone is to use the sync option in iTunes. To do this, connect your phone via USB cable and open iTunes on your computer. Select iPhone from the left panel and select Tones. Put a check on Sync Tones and click the radio button beside the selected tones.
Check all the tones that you want to keep on your phone. This way, the ringtones that you have marked checked will be available on your phone; the rest will be kept in iTunes.
Final Words
Latest MacBook users may face issues with removing the ringtones using iTunes as iTunes are discontinued on Mac devices. However, you can still easily remove the ringtones from the phone following the first option that we have shown. It’s simple, easy, and quick.
More Related Articles:
