I am in the habit of setting up multiple Wi-Fi networks on Mac, but not all Wi-fi networks are trustworthy. Therefore, I have to rearrange Wi-fi network preferences on Mac. It is pretty easy for any Mac user to change Wi-Fi network preference settings on Mac. Follow the steps and you will be able to select which Wi-fi network your Mac should connect first.
As mentioned above, not all networks can win your trust, and hence, you tend to set Wifi priority and thus, manage wireless network on your Mac. When you change preferred Wifi network on Mac, your device will treat as the first choice. However, when your preferred network is not working, Mac will select the second network in the list and get itself connected.
How to Change Wi-Fi Network Preference Settings On Your Mac
Step #1: First of all, click on the Wi-Fi icon from the top right corner of the menu bar on your Mac.
Step #2: Click on Open Network Preferences.
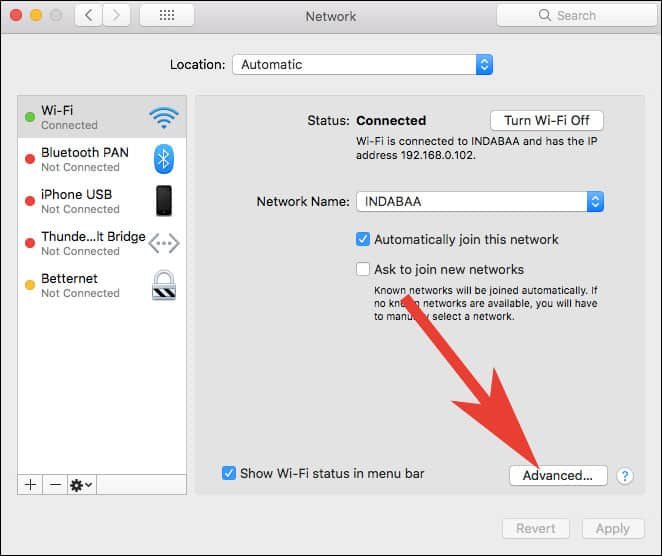
Step #3: Now you will be landed to the Network Settings page, here you need to click on the Advanced.
Step #4: Next, Under Wi-fi tab, you will see a list of all Wi-fi network connections. This list of network connections is the one which you have used it.
Simply click on a Wi-Fi network connection and drag it up or down according to your choice in a list, to put the Wi-Fi network of your preferenced choice.
That’s it friends!
Also Read:
- How to Hide Menubar Icons on Mac
- How to Hide Desktop Icons on Mac
- Mac Keyboard Shortcuts
- Forgot Mac Password
- How to Reset Mac to Factory Settings
Do you frequently Change the Default WiFi Network on your Mac? Share your feedback with us on Facebook, Twitter and Google Plus.


