If you can’t send or receive text messages on iPhone or iPad, you are in an unpleasant situation as you are not able to communicate with anybody via Messages app. This unlike-able condition may stem from faulty network connection or probably you need to perform carrier update on your iPhone X, 8 Plus, 8, 7 Plus, 7, 6(s) Plus, 6(s).
When you face such a problem when you cannot chat with Messages app on iPhone or iPad, you need to follow a few solutions to come out of this issue of iPhone not sending text messages.

Can’t Send or Receive Text Messages on iPhone X, 8 Plus, 8, 7 Plus, 7, 6(s) Plus, 6(s) or iPad? Read the Solutions.
Before you go ahead.
- Update your iPhone to the latest iOS version.
- On your iPhone or iPad (Wi-Fi + Cellular), you need to check carrier settings update (keep your iOS device connected with Wi-Fi or mobile network and then tap Settings → General → About. You will find an option to update carrier settings if any update is available).
- Check the network connection on your iPhone or iPad; it should be running without any hitch.
- Does your mobile carrier support the kind of message (MMS or SMS) you want to send
- Before you send group MMS messages on iPhone, toggle MMS Messaging ON. You should contact your mobile operator if your iPhone doesn’t show MMS Messaging or Group Messaging.
- You need to ensure that you have entered correct mobile number of email id of the recipient.
Message Not Delivered
When your iPhone flashes an alert telling you that message Not Delivered, simply Quit Messages app and launch Settings app.
Next, disable Wi-Fi or Cellular or Mobile and reboot your device.
After rebooting your iOS device, you need to toggle Wi-Fi or Cellular ON.
Now tap on Messages and try to send the message again.
You may also tap on Red Exclamation mark (!) icon next to your message that was not delivered and then tap on try Again.
If you are still unable to send the message, then tap on Exclamation mark (!) icon and then tap Send as Text Message.
Also Check: How to disable WiFi and Bluetooth in iOS 11
iMessage Waiting for Activation Error
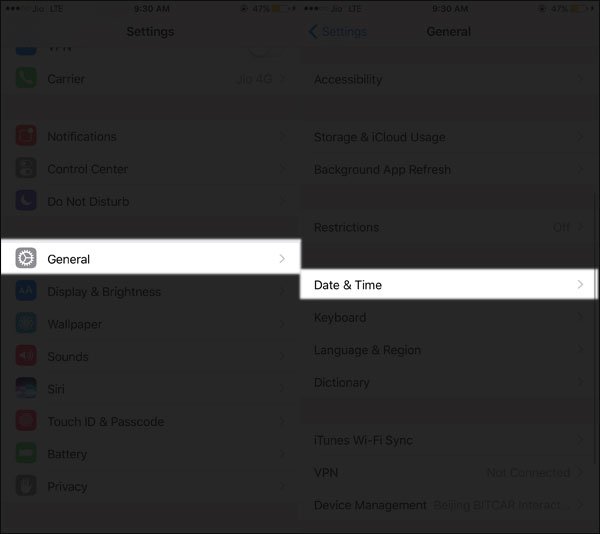
If you encounter Waiting for Activation error, you need to check that date and time on your iPhone are properly set up.
Tap on Settings → General → Date & Time.
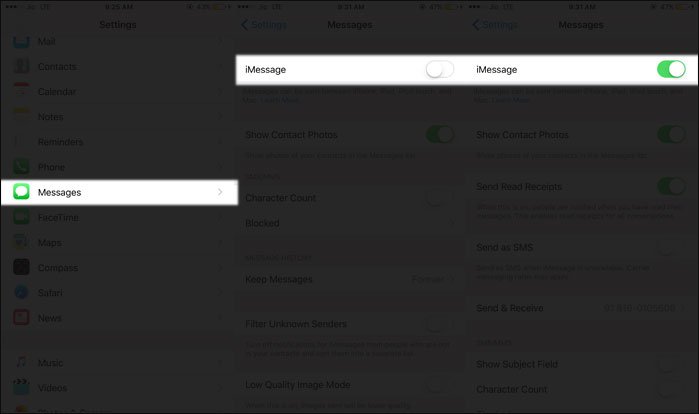
Once Date & Time is set, open Settings → Messages. Toggle iMessage OFF and ON.
Now try to send message from your iPhone.
Group Message Issue
When you find issue in group messages, then you need to delete that conversation and start afresh. Before you delete any conversation, don’t forget to save attachments; just tap and hold the attachment and tap on Save. You can also capture screenshot to save the content of your message before you delete the same.
To delete a conversation, open Messages → Swipe to left on the conversation → Tap Delete.
Once the group conversation is deleted, start a new conversation by tapping Compose icon. Next, enter the phone numbers or email ids of your contacts. Type in your message and tap Send button.
Reset Network Settings on iPhone
Network may be the villain of the piece; here, you can reset network settings on your iOS device.
Step #1: Launch Settings → General → Reset.
Step #2: Tap Reset Network Settings and confirm your action.
Do your contacts see your email id in place of your mobile number when you send messages?
If your iMessage is set to receive iMessages and if it does initiate conversations from Apple ID and not from your phone number, you can follow the steps given below:
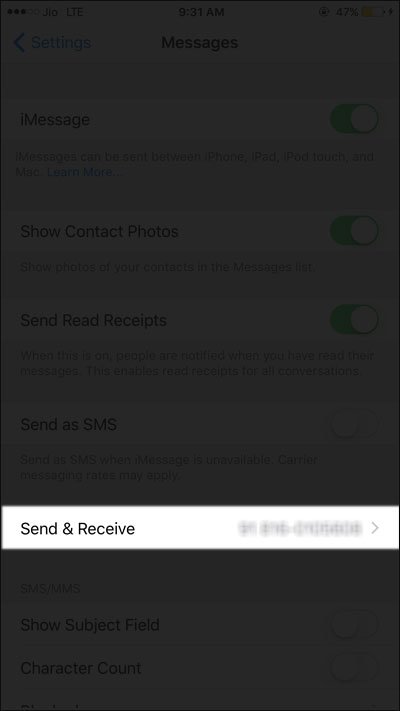
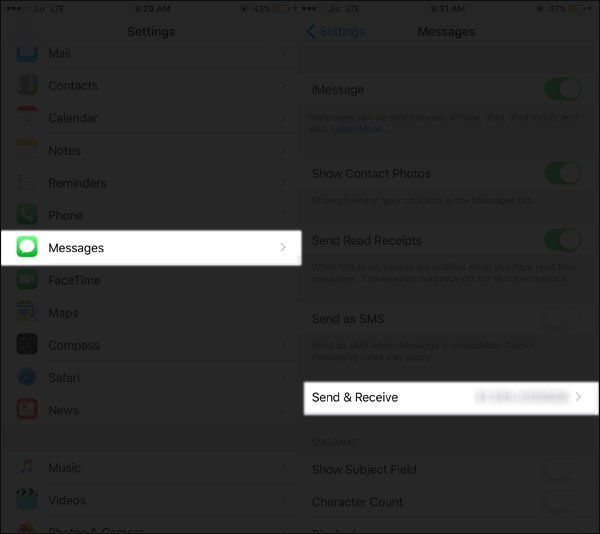
Step #1: Open Settings → Messages.
Step #2: Tap on Send & Receive.
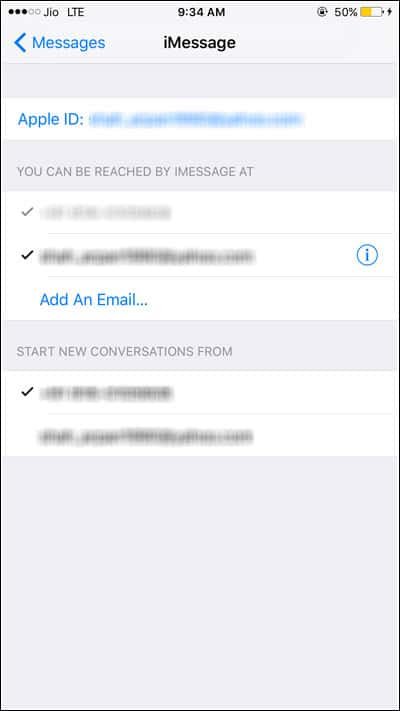
Step #3: Here, you should ensure that your mobile number is listed and selected under ‘You Can Be Reached By iMessage At’ and under ‘Start New Conversations From’.
If your phone number is not listed there, you can add it by following the steps mentioned here:
Step #1: Launch Settings on your iPhone or iPad.
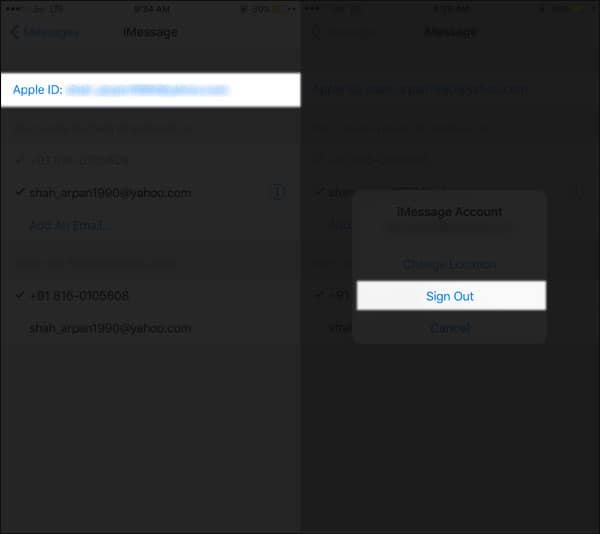
Step #2: Open Messages app → Send & Receive.
Step #3: Tap your Apple ID and then tap on Sign Out.
Step #4: Next, come back to Settings → Messages → Send & Receive.
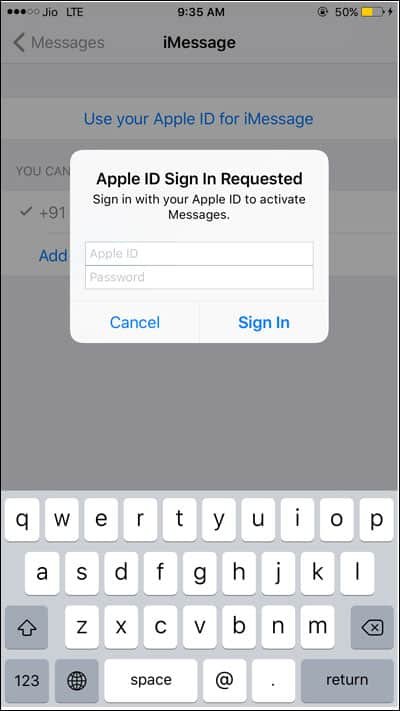
Step #5: Press your finger on ‘Use your Apple ID for iMessage’, and then sign in with your Apple ID and password.
Step #6: Now you should ensure that your phone number and Apple ID are included under ‘You Can Be Reached By iMessage At’.
Step #7: On other devices, open Settings → Messages → Send & Receive.
Step #8: Tap on ‘Use your Apple ID for iMessage’ and then sign in with Apple ID and password.
Apart from Waiting for Activation error, people also face iPhone Activation Errors, which give hellish pain to iPhone users. However, after following a few solutions, users can get rid of these iPhone Activation errors.
While using Messages app, you should also pay enough attention to message cache. If you tend to send pictures and videos through iMessage or Messages, you will pile up a lot of other data. To enjoy better Messages experience, you need to clear message cache frequently from your iPhone/iPad.
Also Check:
How to Fix screen effects not working in iMessage on iOS 10
How to Send iMessage with Bubble Effects
How to Send iMessage with Screen Effects
How to Send iMessage from Windows PC or Laptop.
We hope now you have fixed the issue of cannot send or receive text messages on iPhone. Share your feedback with us on Facebook, Twitter and Google Plus.
