Two-factor Authentication for Apple ID secures your Apple ID when somebody tries to access it from www.icloud.com. Even though a stranger gets your password, this two-factor authentication stops that person from accessing your account. Like other two-factor authentications you might have set up (on Facebook, Gmail, or Twitter), here you will get a six-digit passcode when you enter your Apple ID and password to access your iCloud on web browser. This passcode comes on your iPhone, which is again protected by a passcode or Touch ID. Given the importance of this security layer, Apple users must setup two-factor authentication for Apple ID.
Once you have signed into your trusted device with your Apple ID, two-factor authentication is not needed unless you want to erase your device or need to change your password. This two-factor authentication is rolled out by Apple in its iOS 9 on iPhone, iPad, iPod touch or in Mac with OS X El Capitan and later. A trusted device is the device that Apple knows is yours, and by sending a verification code, Apple gets to know the device is used to verify your identity when you sign in on a different device or browser. Similarly, your trusted phone number is number users possess to get verification codes by text messages or automated phone calls.
How to Setup Two-factor Authentication for Apple ID
Two-factor authentication can be used by iCloud users who are using their iOS devices with iOS 9 running and Mac with OS X El Capitan or later. Now, follow the steps given below to turn on two-factor authentication on your iPhone, iPad, or iPod touch.
For iOS devices running iOS 10.3 or later:
Step #1: Open Settings.
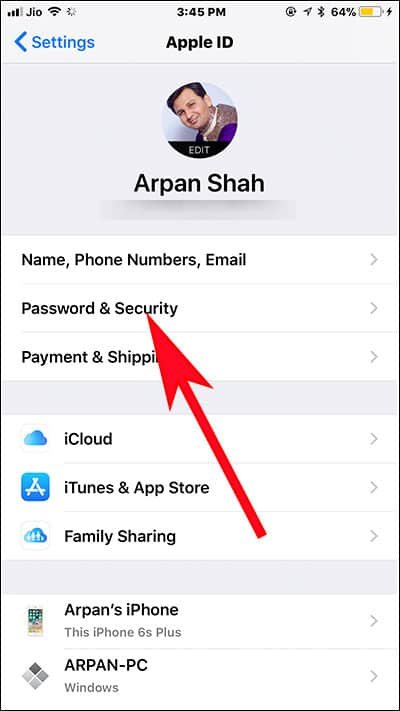
Step #2: Tap on your profile name, which is the very first option.
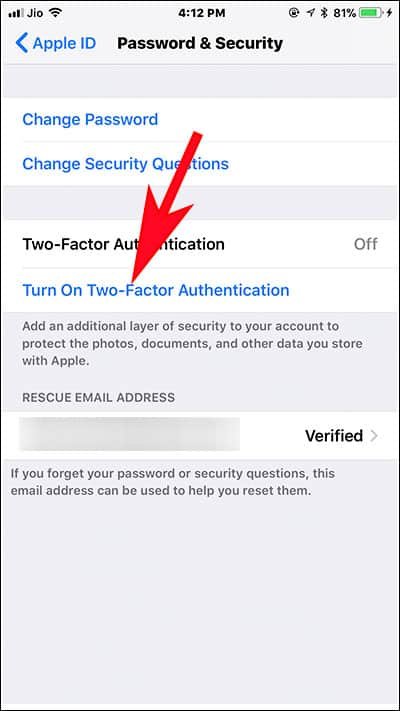
Step #3: Next, tap on Password & Security.
Step #4: Now tap on ‘Turn On Two-Factor Authentication’.
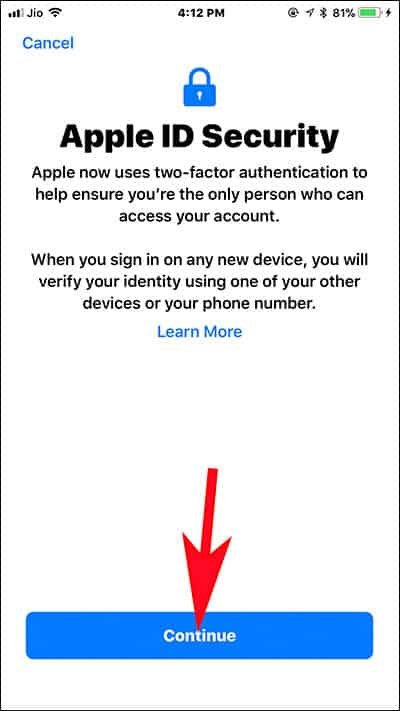
Step #5: You will be landed on Apple ID Security screen; tap on Continue from the bottom of phone screen.
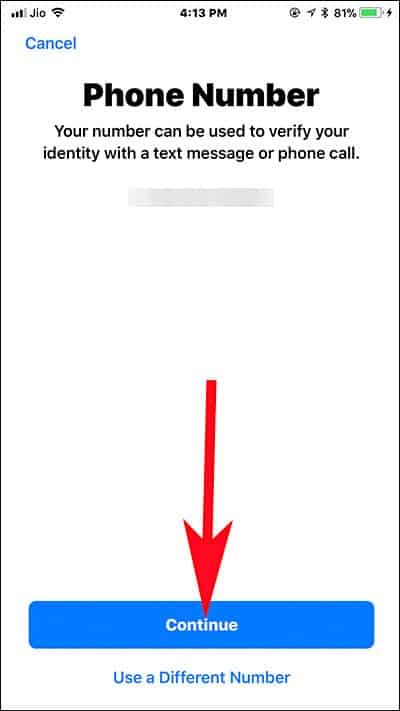
Step #6: Then, you will be asked to enter a phone number that can be used to verify your identity with a text message or a phone call. Here, you are supposed to enter a phone number and then choose one option under VERIFY USING section.
You can either select Text Message or Phone Call; a Text Message is a better option.
Finally, you will receive a six-digit verification code from Apple on your Messages app. Note that the code will be selected on phone by default, hence, you don’t need to copy that code from Messages app.
You have successfully turned on two-factor authentication for Apple ID.
For iOS devices running iOS 10.3 or earlier:
Step #1: Launch Settings on your iOS device.
Step #2: Open iCloud.
Step #3: Next, tap on your Apple ID and then open Password & Security.
Step #4: Now you need to tap on ‘Turn On Two-Factor Authentication’.
Step #5: Then tap on Continue.
Note that Apple may ask you to answer Apple ID security questions.
As mentioned above, you will have to enter the phone number on which you want to receive verification codes when you sign in. You can select either Text Message or Phone Call to receive the codes.
Step #6: Tap on Next and you will receive a verification code from Apple (you will receive this code on the phone number you have provided).
Finally, enter that verification code to verify your phone number and turn on two-factor authentication for Apple ID.
Turn on Two-Factor Authentication on Mac (El Capitan and later)
Step #1: On your Mac, click on Apple menu.
Step #2: Go to System Preferences → iCloud → Account Details.
Step #3: Now, click on Security.
Step #4: Next, click on Turn On Two-Factor Authentication.
Note that Apple has already protected some Apple IDs created in iOS 10.3 or macOS 10.12.4 and later; in this case, you will see two-factor authentication is already turned on.
Things you need to remember while using two-factor authentication
- Don’t forget your Apple ID password
- Use a device passcode on all your devices
- Keep your trusted phone numbers up to date
- Keep your trusted devices physically secure
How to Turn Off Two-Factor Authentication for Apple ID
In case you want to disable or turn off Two-Factor Authentication, you need to follow the steps mentioned below.
Step #1: Open appleid.apple.com on your web browser.
Step #2: Sign in with your Apple ID and password.
Step #3: Since you have turned on Two-Factor Authentication, you will receive a six-digit code on your trusted phone number. Enter that code and go ahead.
Step #4: You will be landed on your Apple ID account management page.
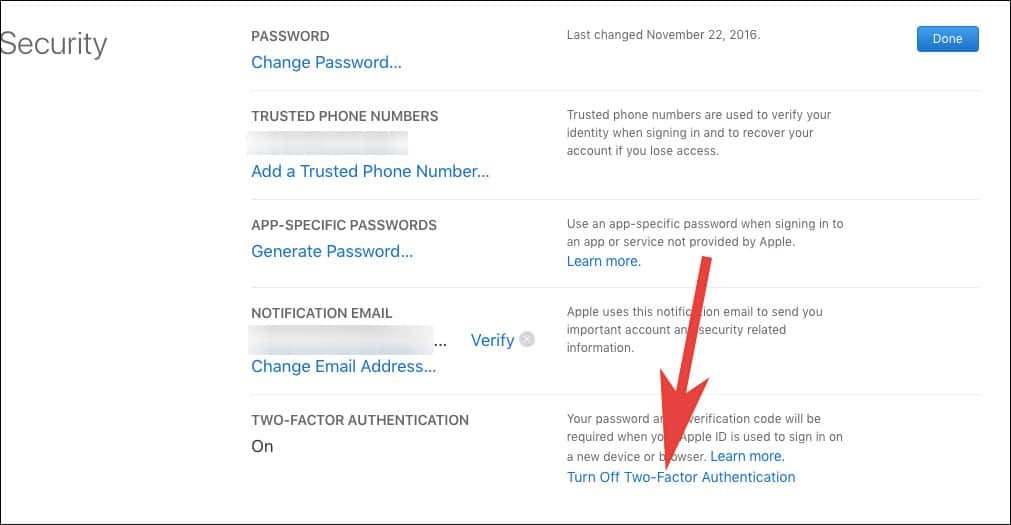
Step #5: Click on Edit button next to Security option.
Step #6: Next, click on Turn Off Two-Factor Authentication, which is next to the option of TWO-FACTOR AUTHENTICATION.
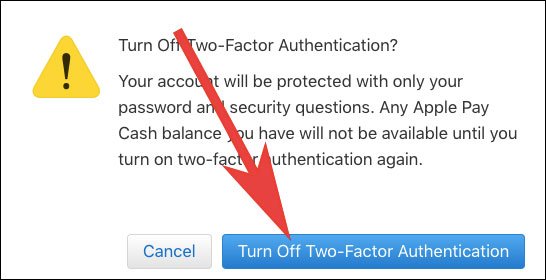
Step #7: A dialog box asks to confirm your action; click on Turn Off Two-Factor Authentication button.
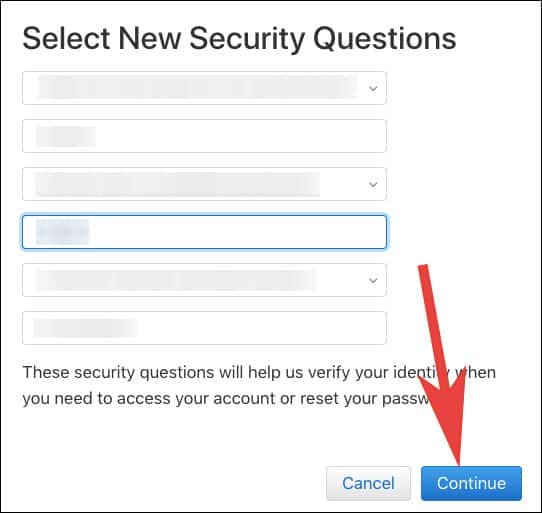
Step #8: Then you will be prompted to select new security questions.
You will have to select three security questions and give answers for each one.
After providing the answers, click on Continue button.
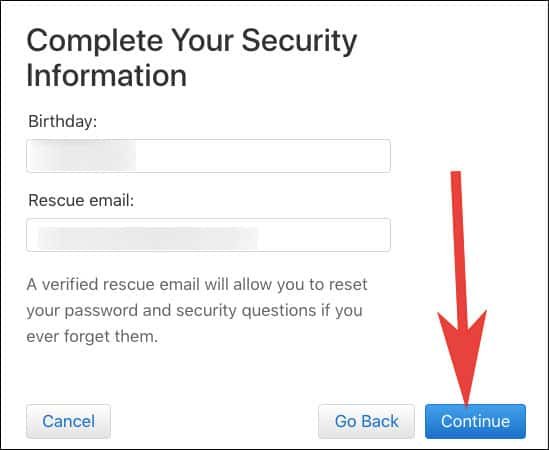
Step #9: Now you will be asked to complete your security information; check your date of birth and rescue email. If you have already submitted a rescue email, simply click on Continue. Here, you can change that rescue email also. Click on Continue.
Step #10: On your rescue email, you will receive a six-digit code, which you need to enter on your computer.
When you enter that code, your two-factor authentication will be turned off.
Summing up…
Two-Factor Authentication is a strong security wall that protects your Apple ID, and therefore, we would advise users to keep it on; and if you haven’t turned it on, follow this guide and set up two-factor authentication for your Apple ID as soon as possible.
Also Check:
Like this feature? Share your feedback with us on Facebook, Twitter and Google Plus.


