You take screenshot on your iPhone for a number of reasons. You would like to show your friends how you scored well in your favourite game. You want to share some funny moments from the video or maybe you like to store the sweet nothings you exchanged with a special one on a chat client for a long time. Reasons may be different but the fact remains that you want to take screenshot in iPhone.
With the release of iOS 11, the AssistiveTouch is now equipped with more options and features. This virtual button now enables you to take screenshot in iPhone without using home and power button. Surprised or shocked? Yes, you can use AssistiveTouch button and take screenshot without pressing any physical button on your iPhone. In this tutorial, we will reveal how you can take screenshot in iPhone.
Here, we will deal with two methods to take screenshot in iPhone. First, we will see how you can take screenshot without using home and power button; second, to take screenshot on iPhone 7 and 7 Plus.
How to Take Screenshot in iPhone
- How to Take Screenshot in iPhone without Using Home and Power Button
- How to Take Screenshot on iPhone 7 and 7 Plus
How to Take Screenshot in iPhone without Using Home and Power Button
Before you can use AssistiveTouch to take screenshot on your iPhone, you need to activate this virtual button on your device. Go to Settings→ General→ Accessibility→ AssistiveTouch→ Toggle AssistiveTouch ON.
Step #1: Once an AssistiveTouch is enabled, you can see that white virtual button floating on your phone’s screen.
Step #2: Now you can open an app or a web page you want to take a screenshot of.
Step #3: Once the app or page is loaded, tap on the AssistiveTouch button.
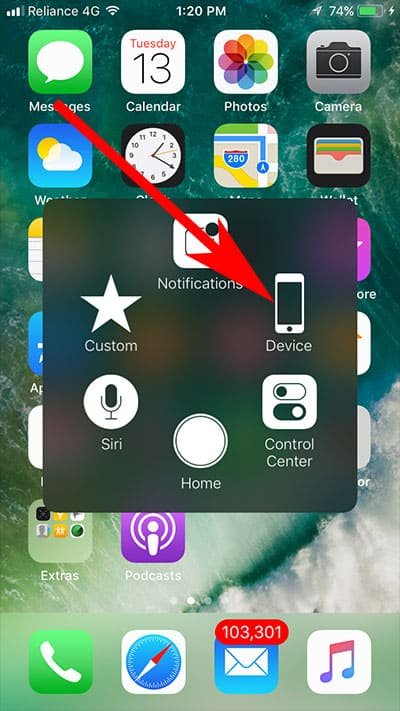
Step #4: You can see six options including the Home button; the other five are: Siri, Custom, Notifications, Device, and Control Center. You need to tap on Device.
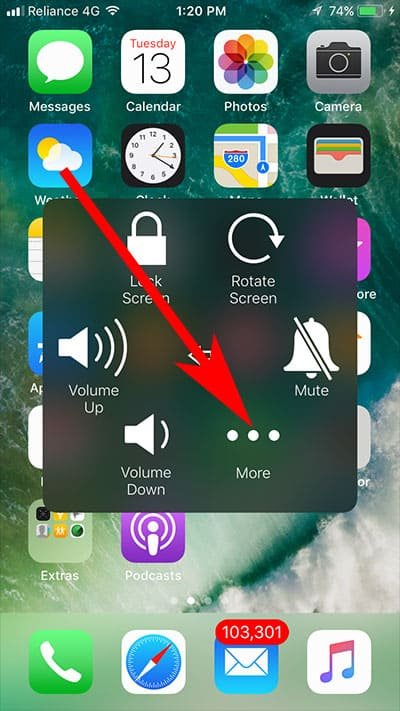
Step #5: Another six options appear on your phone screen: Volume Down, Volume Up, Lock Screen, Rotate Screen, Mute and More. Tap on More (three dots).
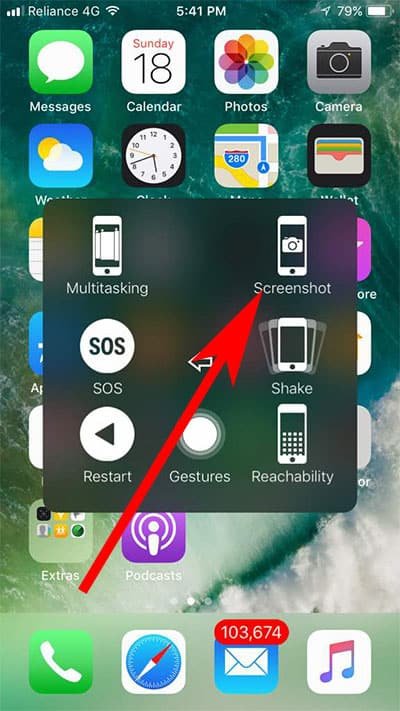
Step #6: Here, you will find an option to take Screenshot along with other few options like Restart, SOS, Multitasking, Shake, Reachability etc. Tap on Screenshot option and a snap of your screen will be taken quickly.
You can access the screenshot from the Photos app; moreover, to check it quickly, you can tap on a mini screenshot that quickly settles at the bottom left corner of iPhone.
How to Take Screenshot on iPhone 7 and 7 Plus
iPhone 7 and 7 Plus allow you to capture screenshot in the same old way as you took on iPhone 6 and 6s versions. But its taptic engine technology gives you a different feeling altogether while you are taking screenshot on your iPhone 7 or 7 Plus. Does it mean there is difference in method of taking screenshots on iPhone 7 and previous iPhones? Not at all. The method remains the same, the experience is changed. However, if you want to force restart or reboot your iPhone 7, you need to follow a different method.
Step #1: Launch an app or a web page you want to take screenshot of.
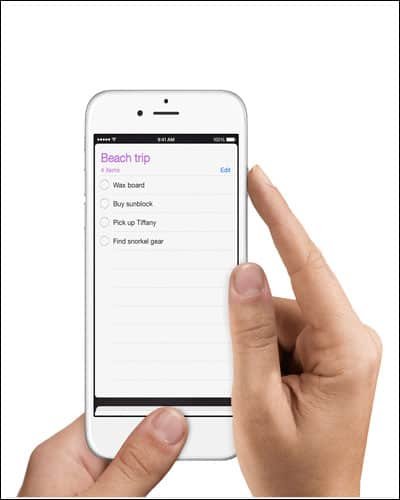
Step #2: Next, press and hold the power button and home button simultaneously. Make sure you hold both buttons at the same time, otherwise, you are all likely to invoke Siri or activate Touch ID.
Step #3: Your iPhone screen will flash white and you can hear that camera shutter sound.
The screenshot is captured and it will be stored in your All Photos album. If you have not enabled iCloud Photo Library, the screenshot will be saved in Camera Roll.
Step #4: If you want to use the screenshot, launch Photos app from Home screen.
Step #5: Tap on All Photos or Screenshot folder.
Step #6: Tap on the screenshot and you can share, favourite, edit or delete it.
Like this information on how to take screenshot on iPhone? Share your feedback with us on Facebook, Twitter and Google Plus.


