Whenever I sync my iPhone and iPad with Windows computer, I assure myself that the data inside is secure. For complete data protection, I also use iCloud and sync my data there. However, I use both Mac and Windows for 200% protection of my iPhone and iPad data, which includes files, docs, videos, photos, and more. You have already got an idea how you can sync your iOS devices with iCloud on Windows. Now, let’s explore another method to sync iPhone and iPad with Windows 10 PC using iTunes.
Moving your iPhone or iPad data to computer or Mac is the best practice to access your phone data from anywhere, anytime. However, you should be aware that syncing of iOS device via iTunes will give access to limited contents like photos, tones, ringtones etc. from your computer. On the other hand, when you use iCloud to sync your devices, you get offline access of your data. Keep your iTunes updated whenever you are migrating iOS data to Windows PC. Finally, to make this process of transferring data quick, use top-notch lightning cable that connects your device with your computer without any hassle.
How to Sync iPhone and iPad Data on Windows 10 PC Using iTunes
Enable Wi-Fi Syncing in iTunes for Windows 10
Wi-Fi syncing between an iPhone/iPad and Windows 10 creates a two-way bridge between the two different devices and operating systems. It is the best way to automatically transfer data when you connect your computer and iOS device with the same Wi-Fi network.
Step #1: Fire up iTunes on your Windows 10 computer.
Step #2: Connect your iPhone/iPad with the computer via lightning cable.
Step #3: Next, click your iPhone or iPad icon from the top left side of computer window.
Step #4: Scroll down and click on ‘Sync with this iPhone over Wi-Fi’ check box from the options.
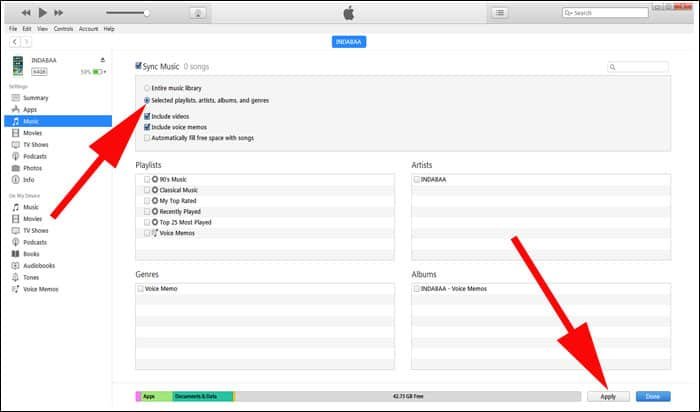
Step #5: Now click on Music under Settings from the left navigation panel.
Step #6: Click on the check box before Sync Music.
Similarly, you can sync Movies, TV Shows, and Photos.
Step #7: In the end, click on Apply and then Sync.
How to Sync Over Lightning Cable or 30-Pin USB Cable
If Wi-Fi sync is not your cup of tea, you can choose another option of syncing over lightning cable or 30-Pin USB cable.
Step #1: Launch iTunes on your computer.
Step #2: Sync your iPhone/iPad with computer via lightning cable.
Step #3: Now click on your iOS device icon from the upper left side on window.
Step #4: Next, click on Music under Settings seen in the left navigation.
Finally, click on Sync Music check box to sync the music.
In the same manner, you can sync Movies, TV Shows and Photos.
Don’t forget to click on Apply and then Sync button from the bottom menu.
It is done! You can now keep your data synced between your iOS devices and Windows 10 computer.
If you are a true-blue Windows user, you would also like to read useful information on transferring photos from iPhone/iPad to Windows 10 PC, and using iMessage on Windows 10 PC.
I hope you liked this complete guide on how to sync your iPhone or iPad to Windows 10 PC. Share your feedback with us on Facebook, Twitter and Google Plus.
![How to Sync iPhone and iPad with Windows 10 PC [Guide]](https://indabaa.com/wp-content/uploads/2016/12/How-to-Sync-iPhone-and-iPad-with-Windows-10-PC-Guide.jpg)


