Taking notes in the middle of your busy schedule is need of the hour. iPhone offers you an amazing app: Notes. This stock app has no equal in other phones, and therefore, people prefer a smartphone like iPhone. With the release of iOS 10, Notes app has seen some good changes. I particularly like a feature which allows me to add Note to lock screen in iOS 10 on iPhone.
There is more to this Notes app as you can now share Notes to other users, who can edit your Notes in their iPhone or iPad devices. For this, you need to update your iOS device to the latest iOS 10. And then follow the steps mentioned below.
Notes app sharing feature can be done if you have created your notes on iCloud and not on your iPhone. By this, you can invite other iPhone and iPad users to edit notes shared with them. Similarly, other users can also invite you to use and edit their notes. This new facility will certainly receive huge response as it can be used for personal and professional advantage by people.
For example, if you are planning a long trip with your friends, you can share notes related to destinations, means of travel, things to consider etc. In your office, you can share minutes of the meeting with your colleague, who can edit the same.
Before you go ahead, check the requirements: your iOS device should be updated to iOS 10 or later versions; your Mac should be running on Mac OS 10.12 or later; and most importantly, you must create notes on iCloud since all your notes will be managed on this platform.
How to Share and Collaborate Notes on iPhone or iPad in iOS 10 from Notes App
By sharing Notes in iOS 10, you invite a person whom you trust to edit the Notes on his/her iOS device. Check, how this works:
Step #1: Launch Notes app on your iPhone/iPad. Make sure that you have created or going to create a note in iCloud and not in iPhone.
Step #2: Tap on the Note you want to share.
Step #3: In the top right corner of note, you will find Share icon, and before this Share icon, you will see a Person icon with ‘+’ button. Tap on this Person icon with + button.
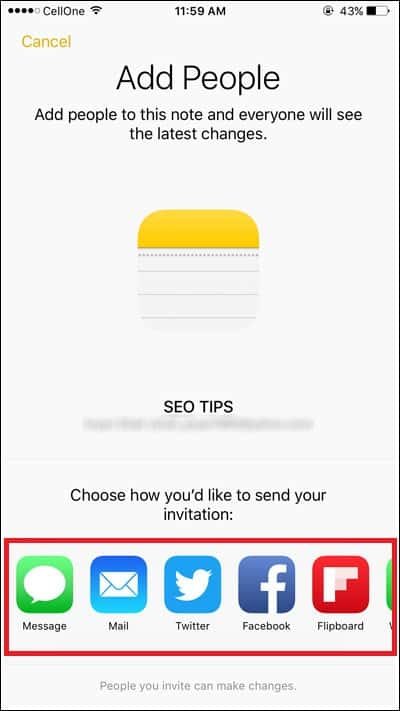
Step #4: Notes app will ask you to add people, who will be able to see the latest changes in the note you will share. From this screen, you need to choose how you like to send your invitation. A few options are given: Message, Mail, Twitter, Facebook, Copy Link, WhatsApp, and More.
You can tap on More and will find more options like Skype, Hangouts, Messenger, Flipboard etc.
Step #5: Select any one option and send the note sharing invitation to your friends/family/colleagues.
Your invitation will be sent to the person you have selected, and he/she will be able to make changes in the notes you have shared with them on their iPhone, iPad or Mac.
Later on, if you wish you can stop the person from editing or viewing your notes by removing access.
How to Stop People from Accessing Shared Notes in iOS 10
Follow the first three steps as mentioned above.
Step #4: Once you tap on Person icon with + sign, you will see the name of owner (you) of the note and the person, whom you have invited.
Step #5: Tap on the contact you have invited to edit/view notes.
Step #6: Next, you will see his/her name & phone number. Below this, you can see Remove Access button; tap on it.
That’s it! The person with whom you have shared notes will be removed and s/he won’t be able to view or edit your notes.
Meanwhile, if you wish to revoke access to the note you have shared with multiple contacts/persons, you can do this by tapping on Stop Sharing button seen on People screen.
Upon tapping the Person icon, a screen appears with a name of owner (you) and the person you have invited. The last option is Stop Sharing; tap on this button and a pop-up appears on your phone’s screen. Confirm your action and the app will stop sharing notes with other people.
Hope you like this information. Share it on your social media profile page. Also share your feedback with us on Facebook, Twitter and Google Plus.
