Notes app is one of the most useful productive apps on your iPhone and iPad. I normally save my important notes and contents (links mostly) in Notes app. Moreover, I also keep some financial information like monthly expenses in Notes app. Therefore, I need complete security of my Notes so that I can prevent any stranger from accessing my Notes. Thankfully, Apple gives you an excellent feature of lock. Here is how to lock Notes with Password or Touch ID on iPhone and iPad.
Unfortunately, you cannot hide your entire Notes app as you can hide other stock and downloaded apps on your iPhone and iPad. But your notes are well protected with the default lock feature on your device.
How to Lock Notes on iPhone and iPad With Password or Touch ID
Points to Ponder
- You cannot lock notes you have shared with somebody.
- When you lock a particular note on your iPhone or iPad, its effect will be reflected on Notes app in Mac also. Moreover, if you are using Windows computer, you will see a lock on that note when you access the app using iCloud URL.
- Similarly, when you remove lock, the effect will be seen everywhere.
- You can lock your notes from Mac as well.
- You cannot lock entire Notes app; neither can you hide entire Notes app using Restrictions feature.
Quick Links
- How to Set Password for Notes on iPhone and iPad
- How to Set Password in Notes from Settings
- How to Lock Notes with Password or Touch ID on iPhone and iPad
- How to Unlock Notes with Password or Touch ID on iPhone and iPad
- How to Re-lock Notes on iPhone and iPad
- How to Remove Lock for Notes on iPhone and iPad
- How to Change Notes Password on iPhone and iPad
- How to Reset Notes Password on iPhone and iPad
How to Set Password for Notes on iPhone and iPad
When you try to lock a note for the first time, you will be prompted to set a global password; similarly, if you wish to lock notes from Notes Settings, you will have to set a global password for notes.
Here, we will deal with how to set a password in Notes.
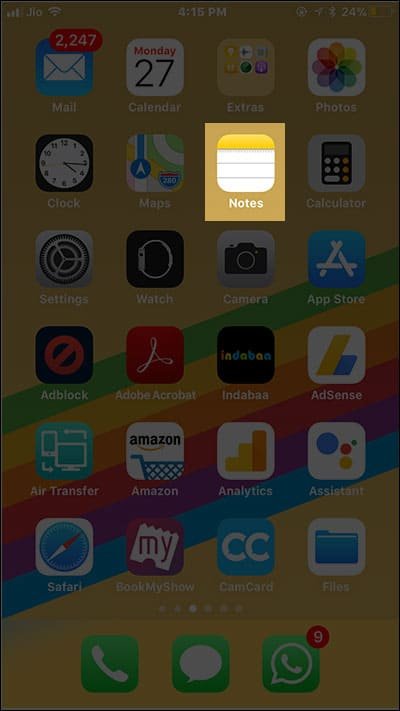
Step #1: Open Notes app from the home screen of your iPhone or iPad.
Step #2: You can either select a current note available or create a new one.
Step #3: Once you add enough content, tap on Share button. If it is an existing note, tap on Share button directly.
Step #4: Two menus will swipe up from the bottom of your device screen; from the lower menu, you need to tap on Lock Note.
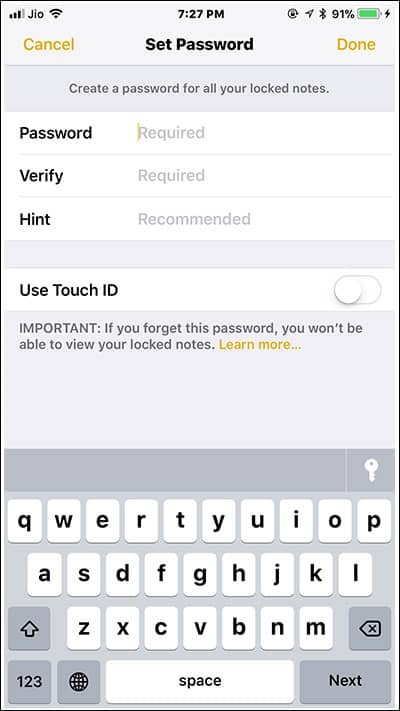
Step #5: Here, you need to type in your password; remember, this password will be applicable to all notes in the app, including the Notes on your Mac or Windows PC.
Step #6: You will have to enter the same password to Verify.
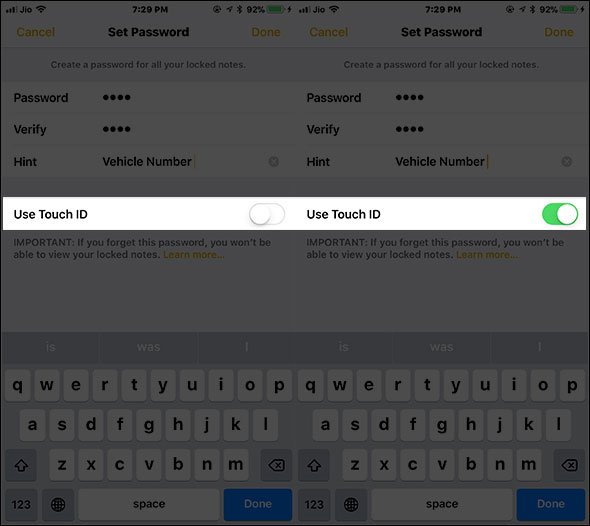
Step #7: You can add a hint in case you tend to forget passwords.
Step #8: Finally, toggle Touch ID button ON; this will enable you to use Touch ID to unlock notes.
Step #9: Tap on Done.
How to Set Password in Notes from Settings
Step #1: Open Settings app on your iPhone or iPad.
Step #2: Scroll down and then tap on Notes.
Step #3: Next, you need to tap on Password.
Step #4: Now enter a password; again, this password will be universal as it applies to all notes on your device as well as Notes app in Mac or Windows PC.
Step #5: Type in the same password again to Verify.
Step #6: You will be asked to add a hint in case you forget password.
Step #7: Last, turn on Touch ID button so that you can use your fingerprint to unlock notes.
Step #8: After entering all necessary details, you need to tap on Done.
How to Lock a Note with Password or Touch ID
After setting up a password, you can lock a note easily.
Step #1: Open Notes app on your iPhone or iPad.
Step #2: Launch any current note or create a new one.
Step #3: Next, you need to tap on a Share button.
Step #4: Two menus will appear from the bottom of your device screen; tap on Lock Note from the lower menu.
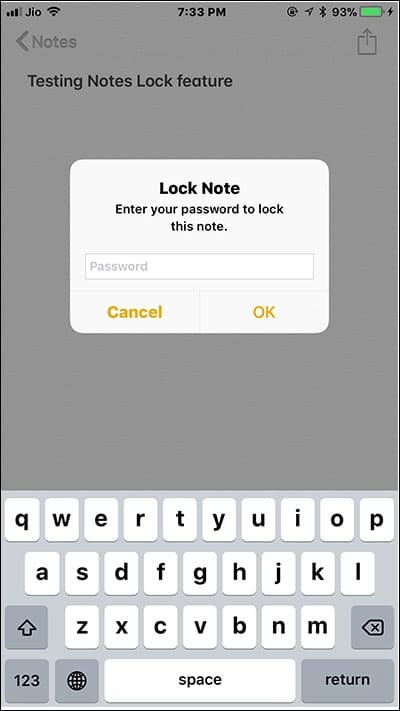
Step #5: Here, you can either use your password or Touch ID to lock the note. If you use your password, don’t forget to tap on OK button.
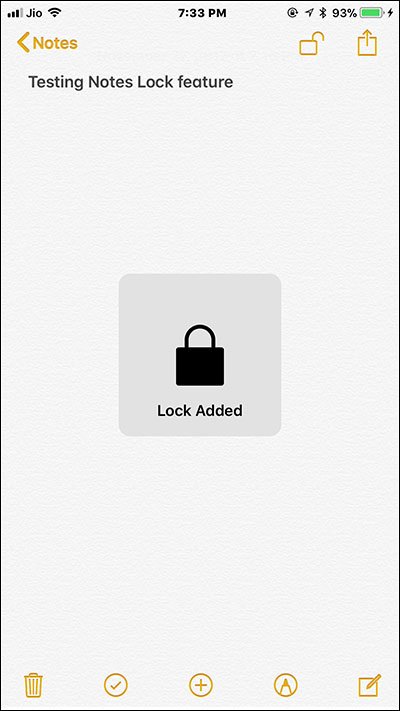
Step #6: Now tap on the ‘Unlocked’ lock icon from upper right corner of your device screen.
Step #7: “This note is locked” – this message will appear on your device screen. Below the message, you will see ‘View Note’ option.
In case you don’t see Touch ID option here, simply use your password for the first time. Next, the app will present you with Touch ID option to lock and unlock the note.
The feature is smart enough to keep title of the note visible while the contents in the note will be hidden when you lock the note. This makes it easier for you to locate the app you want to use and unlock in future. You should be careful enough to write the title of the note; it should not reveal any important data.
How to Unlock Notes with Password or Touch ID
Step #1: Tap on Notes app from the home screen.
Step #2: Tap on the note you want to use/edit.
Step #3: You will see “This note is locked” text; below this, ‘View Note’ is written.
You can tap anywhere on Lock symbol or the text.
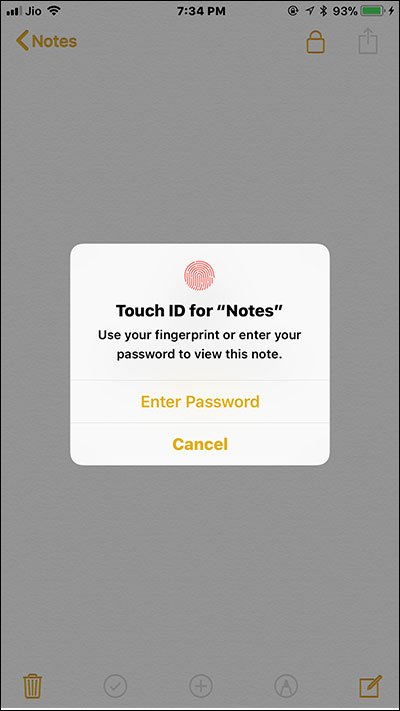
Step #4: You will be prompted to use Touch ID or Enter Password to unlock note.
It is advisable to use Touch ID as users tend to forget password often. Your note is unlocked now.
How to Re-lock a Note
If you have quitted Notes app after unlocking a note, you can open the Notes app again and re-lock that note, which was left unlocked by you.
Step #1: Open Notes app on your iOS device.
Step #2: Tap on the note you want to re-lock.
Step #3: Now tap on the unlock icon from the upper right corner.
Your note will be locked again; and to open it, you have to unlock it again with your password or Touch ID.
How to Remove Lock for Notes on iPhone and iPad
Step #1: Launch Notes App on your iPhone or iPad.
Step #2: Enter Password or Use Touch ID to open Note.
Step #3: Tap on Share button from top right corner.
Step #4: Here you need to tap on Remove Lock.
How to Change Notes Password
At any time, you can change your Notes password, which will be applicable to all notes inside the app.
Step #1: Open Settings on your iPhone or iPad.
Step #2: Tap on Notes.
Step #3: Next, tap on Password.
Step #4: Now, you need to tap on Change Password.
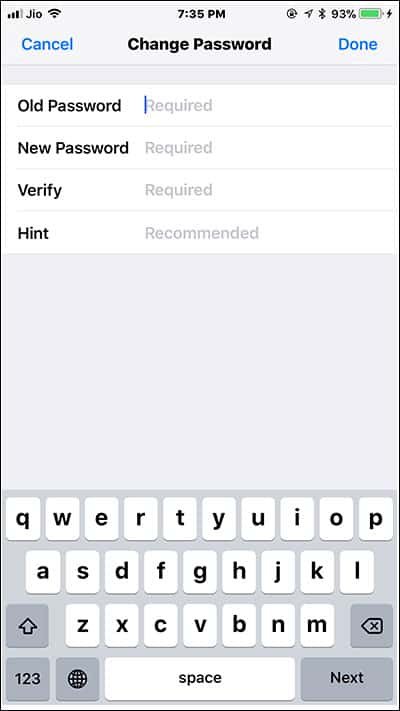
Step #5: First, you will be asked to enter your old password.
Step #6: After typing in your old password, enter the new password; enter the same password again to Verify.
Step #7: You can type a hint.
Step #8: Finally, tap on Done button.
How to Reset Notes Password
Forgot your notes password? Not to worry, you can reset notes password by using your iCloud password.
Step #1: Open Settings on your device from home screen.
Step #2: Scroll down and then tap on Notes.
Step #3: Next, you need to tap on Password.
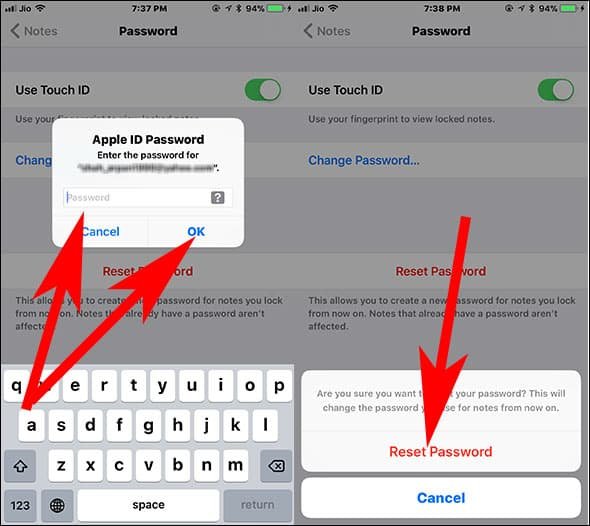
Step #4: Now tap on Reset Password option, which is available in red fonts.
Step #5: Here, you need to type in your Apple ID password, which you enter when you sign in iCloud. (Follow this guide if you have Forgotten Apple ID Password)
Step #6: Type a new password; this password will apply to all your future notes, which you want to lock.
Step #7: Type in the same password to Verify.
Step #8: You can add a hint so that you can get help in case you forget password.
An important thing to note here is that your old password will not be reset by the steps mentioned above. This new password will apply to all notes you will lock henceforth. Your old locked notes are of no use for you; in case you remember the old password, you can simply update it with the new password. When you open your old notes with the old password, Apple will ask you to update this new password for all notes, including the old ones. It is better to use Touch ID in place of password to avoid any unforeseen situation.
The entire Notes app seems complicated when it comes to locking your notes with password or Touch ID; however, do some practice and then manage all your notes efficiently on your iPhone or iPad. Remember, when you have locked multiple notes, unlocking one will also unlock other notes. Similarly, when you lock one note, other notes will also be locked. This means, if you working on different notes in a single folder, you have to enter your password each time you want to open a note. Therefore, Touch ID is a smarter choice for any user.
Explore More about Notes App:
- How to Insert Tables in Notes on iPhone and iPad in iOS 11
- How to Pin Notes in iOS 11 on iPhone and iPad
- How to Pin Notes on Mac in High Sierra
- How to Add Notes to Lock Screen on iPhone and iPad
- How to Create Tables in Notes on Mac in High Sierra
- How to Hide Alerts from Shared Notes on iPhone and iPad
- How to Share and Collaborate Notes on iPhone and iPad
- How to Backup iPhone Notes on Windows PC
- How to Move Files from Evernote to Apple Notes
- How to Scan Documents with iPhone and iPad Using Notes App
Want to add something here? Share your feedback with us on Facebook, Twitter and Google Plus.

