Normally, users have noticed that iTunes doesn’t recognize iPhone or iPad or it says that iPhone is in recovery mode. Second, the iPhone screen is stuck on the Apple logo for some time and there is no progress as such. And third, users see Connect to iTunes screen. In these situations, users are supposed to put their iPhone or iPad into recovery mode. But for some unforeseen reasons, their iPhone stuck in recovery mode.
There are four solutions to exit recovery mode. In this complete guide, we will deal with all the four solutions one by one, and you will be able to get iPhone out of recovery mode without losing your data.

How to Fix iPhone Stuck in Recovery Mode
Method 1: How to Fix iPhone Stuck in Recovery Mode Without a Computer
Step #1: Take your iPhone in your hands and then press power (sleep/wake) button and home button simultaneously for 10-15 seconds.
Step #2: Release the buttons when you see an Apple logo on your device screen.
Note that above method is applicable to your iPhone 6s and previous devices like iPhone 6 and others. If you own iPhone 7 and other advanced iPhones, you need to change the button combination to get your iPhone out of recovery mode.
Step #1: On your iPhone 7 and newer devices, press and hold power button and volume down button simultaneously for 10 odd seconds.
Step #2: When your see Apple logo on the phone screen, release the buttons.
If you have iPhone X, iPhone 8 or iPhone 8 Plus, then you need to follow this process to reboot iPhone X, iPhone 8 or iPhone 8 Plus
Method 2: How to Fix iPhone Stuck in Recovery Mode Without Data Loss
Many users have complained of data loss during the process. Well, you can use reliable software that can help you and still keep your phone data safe. Dr.fone – Repair gives you a one-stop solution for multiple problems on your iPhone and iPad. Whether your iPhone is stuck in recovery mode, white Apple logo, black screen, looping on start or any other issue, you can use dr.fone – Repair.
The software works on almost all models of iPhone, iPad and iPod touch. Moreover, you can download the software on your Mac and Windows computer as well.
Download dr.fone – Repair on Windows PC
Download dr.fone – Repair on Mac
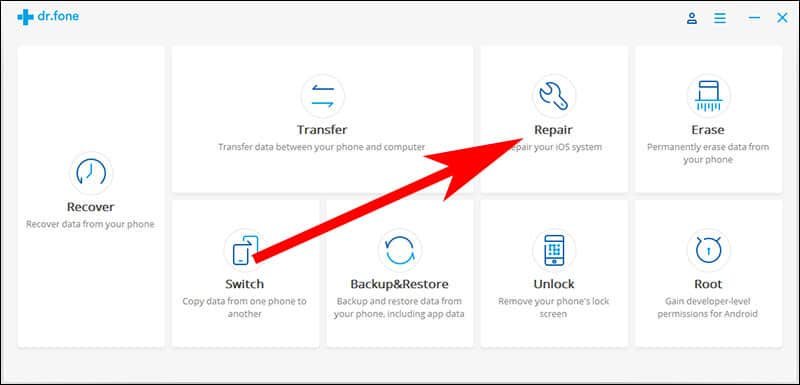
Once you download dr.fone – Repair on your Mac or Windows computer, open the software and click on Repair square from the software interface; and then follow the steps given below.
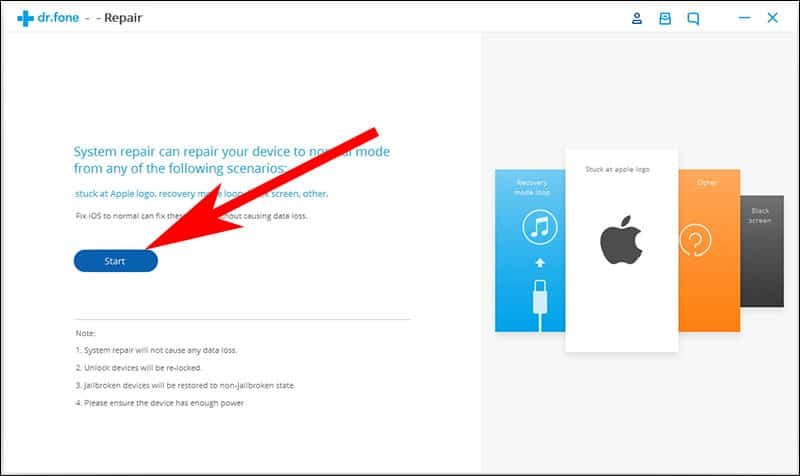
Step #1: Connect your iPhone or iPad with your computer and wait till the software detects the issue. Now, click on Start button to set off the process.
Step #2: Next, you are required to put your iPhone or iPad into DFU mode. We have published two different process for iPhone 7, 7 Plus, iPhone 8, 8 Plus and iPhone X.
If you have iPhone 6s or older phones, simply press and hold Power button and home button simultaneously for approximately 10 seconds; after ten seconds, release the power button and keep pressing home button until your phone restarts in recovery mode.
Step #3: The moment your iPhone enters into DFU mode, the software will detect it.
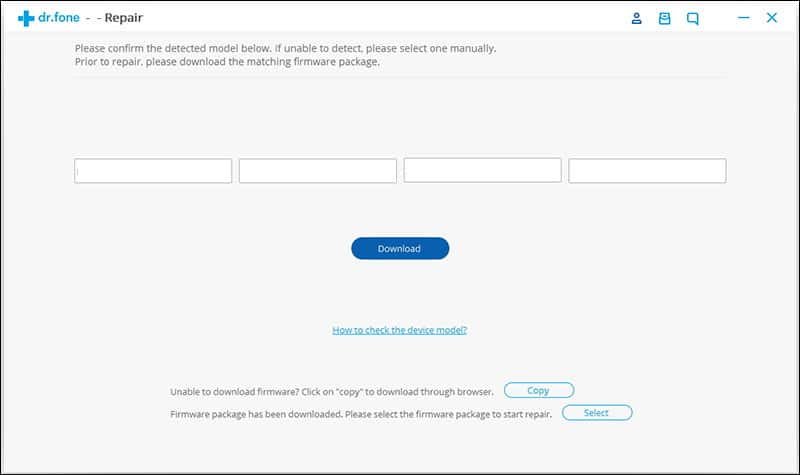
Step #4: Now you are required to submit basic information regarding your iOS device and download the firmware update.
Step #5: After clicking the Download button, you might have to wait for some time; the download process will surely take time (perhaps, you would like to have a cup of coffee meanwhile).
Step #6: When the firmware update is downloaded, you can see a screen where you will find your device information like model and system version. Simply click on Fix Now button to solve the issue.
Step #7: Dr.fone – Repair will start its job of fixing the issue; again, the process may take some time. When the process finishes, your iPhone or iPad restarts and you can see a screen on your computer: “Repair of the operating system is complete”.
Step #8: It is time to disconnect your iPhone or iPad from the computer.
Method 3: How to Fix iPhone Stuck in Recovery Mode with TinyUmbrella
This hybrid tool that is compatible with almost all iPhones and iPads running latest iOS 11. Though the tool is not as strong as others, it can certainly help you in a limited way to fix basic issues related to iOS.
Step #1: Download TinyUmbrella from this link on Mac and Windows PC.
Step #2: Open the tool on your computer and then connect your iPhone with the computer via lightning cable.
Step #3: This tool begins to detect the device automatically.
Step #4: When your device is detected by TinyUmbrella, click on ‘Exit Recovery’ button from the screen.
Now, simply disconnect your device from the computer. The tool is not the perfect one to fix iPad stuck in recovery mode issue. Moreover, during the process, you may lose your device data.
Method 4: How to Fix iPhone Stuck in Recovery Mode with iTunes
If you want to use iTunes to solve this problem, you need to take iCloud backup of your iPhone or iPad as this process may erase the data.
Before you go for this method, download the latest version of iTunes on your Mac or Windows computer.
Step #1: Connect your iPhone or iPad with the computer via lightning cable.
Step #2: Launch the latest version of iTunes on your computer.
iTunes will detect your iPhone or iPad and you can see its icon on the top left corner of screen.
Step #3: Once iTunes finds that your device is stuck in recovery mode, it will show following prompt on screen.
Step #4: Simply click on OK button seen on the prompt and your device will be restored by iTunes. After a few seconds, your iPhone or iPad will restart in normal mode.
You can apply one of the four methods mentioned above to get iPhone out of recovery mode. However, we recommend to download dr.fone – Repair as it saves your data and content on your device.
Which method do you like the most? Share your feedback with us on Facebook, Twitter and Google Plus.


