Apple has released an important update for iOS and Mac users. With this update, users can change their Apple ID email from a third-party email services like Gmail or yahoo to iCloud. A true-blue Apple lover would surely welcome this change as until now, they have been using third party provider as their Apple IDs. But now users can change Apple ID from third-party to Apple email address.
This means you can use @iCloud.com, @mac.com or @me.com in your Apple ID Email address. At the same time, Apple makes an important disclaimer that once you change your Apple ID from a third-party email address to an Apple one, you cannot go back to the third-party domain; you are stuck with the Apple domain. This is one of the biggest updates of the year and even experts are surprised as to why Apple took such a long time to roll out this important update.
Before you change your Apple ID, you have to sign out of every Apple service and device you have been using with your Apple ID. Then you can follow below-mentioned steps to switch your Apple ID.

How to Change Apple ID from Third-party to Apple Email Address
- How to Move Apple ID Email from Third Party to Apple Email Address
- How to Convert Apple ID from a Third-Party Email to Apple Domain
- How to Change Apple ID Email from Mac or Windows PC
How to Move Apple ID Email from Third Party to Apple Email Address
If you are already using an Apple ID that has @icloud.com, @me.com, or @mac.com domains, you can choose one of the three domains as your Apple ID.
Step #1: Open appleid.apple.com and sign in.
Step #2: Click Edit in the Account section.
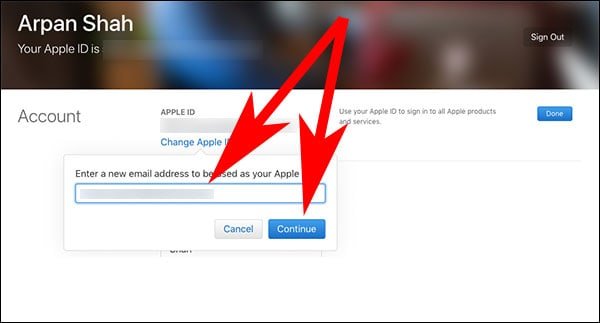
Step #3: Next, you need to click on Change Apple ID under your Apple ID.
Step #4: Here, you can see a list of emails to select from that you can use as your Apple ID. This list has extra email IDs associated with your account.
Step #5: Select one email you wish to use as your Apple ID.
Note that you can only change your Apple ID to an @icloud.com, @me.com, or @mac.com email.
Step #6: Finally, click on Continue.
How to Convert Apple ID from a Third-Party Email to Apple Domain
Before you go ahead, you need to sign out of all Apple services and devices that use Apple ID. If you are using your iPhone, iPad, or iPod touch to switch your Apple ID, just stay signed in on that device. Here you can use another third-party email address or select one from @icloud.com, @me.com, or @mac.com email.
Switch Apple ID Email Using iPhone, iPad, or iPod touch
Step #1: Open Settings on your iOS device.
Step #2: Now tap on your profile name and then open Name, Phone Numbers, Email.
Step #3: Next to REACHABLE AT, tap on Edit.
Step #4: Simply delete your current Apple ID by tapping on the red dot.
Step #5: Tap on Continue and then enter New Apple ID you want to use.
Step #6: Finally, tap on Next.
How to Change Apple ID from Mac or Windows PC
Step #1: Open appleid.apple.com and sign in.
If you have enabled two-factor authentication, you will receive a six-digit code on your iPhone; simply enter the code and move on.
Step #2: The first section is ACCOUNT; click Edit next to REACHABLE AT or CONTACTABLE AT.
Step #3: Click on Change Apple ID…under your Apple ID.
Step #4: Type in the Apple ID you wish to use.
Step #5: Last, click on Continue.
If you use an Apple ID that ends with @icloud.com, @me.com, or @mac.com, you get a message to confirm. As mentioned above, when you switch your Apple ID to @icloud.com, @me.com, or @mac.com email, you cannot go back to a third-party email. Your third-party email address becomes your additional email for Apple ID account.
When you convert your Apple ID from a third-party email address to an Apple domain, you have to verify your account. Apple sends a verification code to an email ID that you have used as your Apple ID. You need to enter that verification code into the fields provided and start using the new Apple ID.
Once your Apple ID is changed, you have to use your new sign-in info with all Apple services you use.
Also Check:
- Forgot Apple ID Password
- How to Change Email Address Linked With Apple ID
- How to Fix Apple ID Disabled or Locked Issue
- How to Delete Apple ID from iPhone and iPad
- How to Fix iPhone keeps Asking Apple ID Password
Need more help? Share your feedback with us on Facebook, Twitter and Google+.


