Do you feel like your PC is underperforming? There are many things that can slow down your computer and fortunately, there are also many ways to manually speed up its performances and take your gaming experiences to the next level. Today we are going to help you speed up your PC in 5 quick steps.
If you are not tech-savvy and you don’t feel that comfortable tweaking out the PC’s software, then you shouldn’t worry about it because we are going to present it all in a step-by-step manner. You can also shoot us questions in the comments section and we will answer ASAP. Without any further, let’s see how you can improve the speed of your PC.
5 Ways to Speed Up Your PC
#1 Tweak the Restart Settings

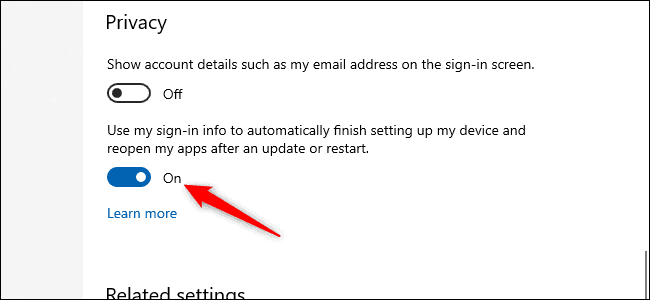
Did you know that when you restart your computer, the operating system will automatically try to open all the apps and games that you were using before hitting the restart button? This might not seem like such a big problem, but it uses up quite a lot of performance power. On the bright side of things, this setting can be disabled with a simple click.
Head over to the “Settings” menu and select access Accounts – Sign-In Options. The next step is to access the “Privacy” panel and then turn off the slider called “Use My Sign-In Info To Automatically Finish Setting Up My Device And Reopen My Apps After An Update Or Restart.”
#2 Adjust the Power Plan
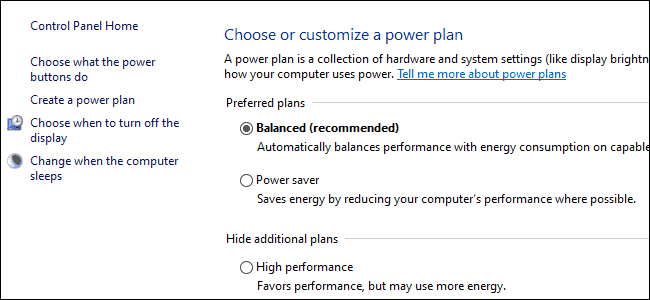
If you are using a laptop, then the power plan that you are using plays a major role in overall performance. Windows 10 is trying by default to save up as much battery power as possible and it enables a power plan mode called “Balanced”. The mode works great if you are using the laptop without a charger but if you keep it plugged in, then you should make sure to enable the “High Performance” mode.
As the mode’s name implies, High Performance is going to allow your laptop’s hardware to run at full power. Therefore, you will see a major boost in performance. Access the Control Panel and then select “Power Options”. Next, click on “Show additional plans” and select the “High Performance” mode.
#3 Disable Startup Programs
One of the main reasons why PCs start slowing down is because they are filled with programs that automatically open when the device is booted. Installing too many startup programs will significantly slow down the boot time of your PC, even though you may be running your operating system on an SSD. Luckily, it doesn’t take more than a couple of clicks to get rid of startup programs.
Do you really want apps such as Discord, Epic Games or Steam to automatically open when your PC is booting? It’s always better to access their individual “Settings” menu and disable this feature. You can always manually open the programs when you need them.
#4 Get Rid of OneDrive
This might come as a surprise to some of you, but OneDrive has a massive impact on your PC’s performance. The reason behind this is that OneDrive introduces superfluous system resource usage. Therefore, you should consider uninstalling OneDrive if you are not using the cloud service features that the program offers.
Access the Start menu and then right-click on “OneDrive”. The icon should be located under the “O” section. Next, select the “Uninstall” option. We also want to mention that it would be a good idea to save all the files that you stored on OneDrive before uninstalling the program.
#5 Adjust Menus and Animations for Best Performance
The last tip that we want to share with you is also the best one. Windows 10 uses visual effects such as animations for menus in order to make them look better. While this feature is nice to have around, it does take a toll on your PC, especially if you are running low on RAM and CPU power.
Search for the “Performance” option in the taskbar and then click on the “Adjust the Appearance and Performance of Windows”. Now, you should select the “Adjust for Best Performance” option and then click on the “Apply” option. This small change might not make a huge difference on mid-ranged laptops and PCs, but it’s certainly going to be felt on budget-oriented devices.


